


Education
Digital Radiographic Grids: A Deep Dive
Explore the technology behind digital radiographic grids with a detailed look at advanced algorithms that improve image quality and patient safety
Concise guide to radiographic technique, positioning, and image evaluation for diagnostic imaging professionals and students using the VMC simulations.
Depending on your institution’s licenses, you may have access to additional simulations. These will appear as separate icons and titles on the login screen. Choose the radiography icon by clicking on it.

On the next screen, choose a body area to practise on: Skull, Upper Limb, Torso, or Lower Limb.
Then select a specific body part within that region.
For example, select Torso to see options such as Chest, Abdomen, or Lumbar Spine.


Then select which projection you wish to start with and whether you want to use the VR or 2D (Desktop) simulation.

2D Simulation Interface
In 2D mode, the simulation will launch inside the Radiography Suite. Depending on your computer, it may open immediately or appear as an icon in your taskbar
Once open, you’ll see the workflow icons along the bottom of the screen. These make up the user interface and allow you to navigate the software and complete specific tasks.
VR Simulation Interface
In VR mode, the simulation will launch directly in your head-mounted display (HMD).
You'll be placed inside the Radiography Suite, where you can interact with the environment using your VR controllers.
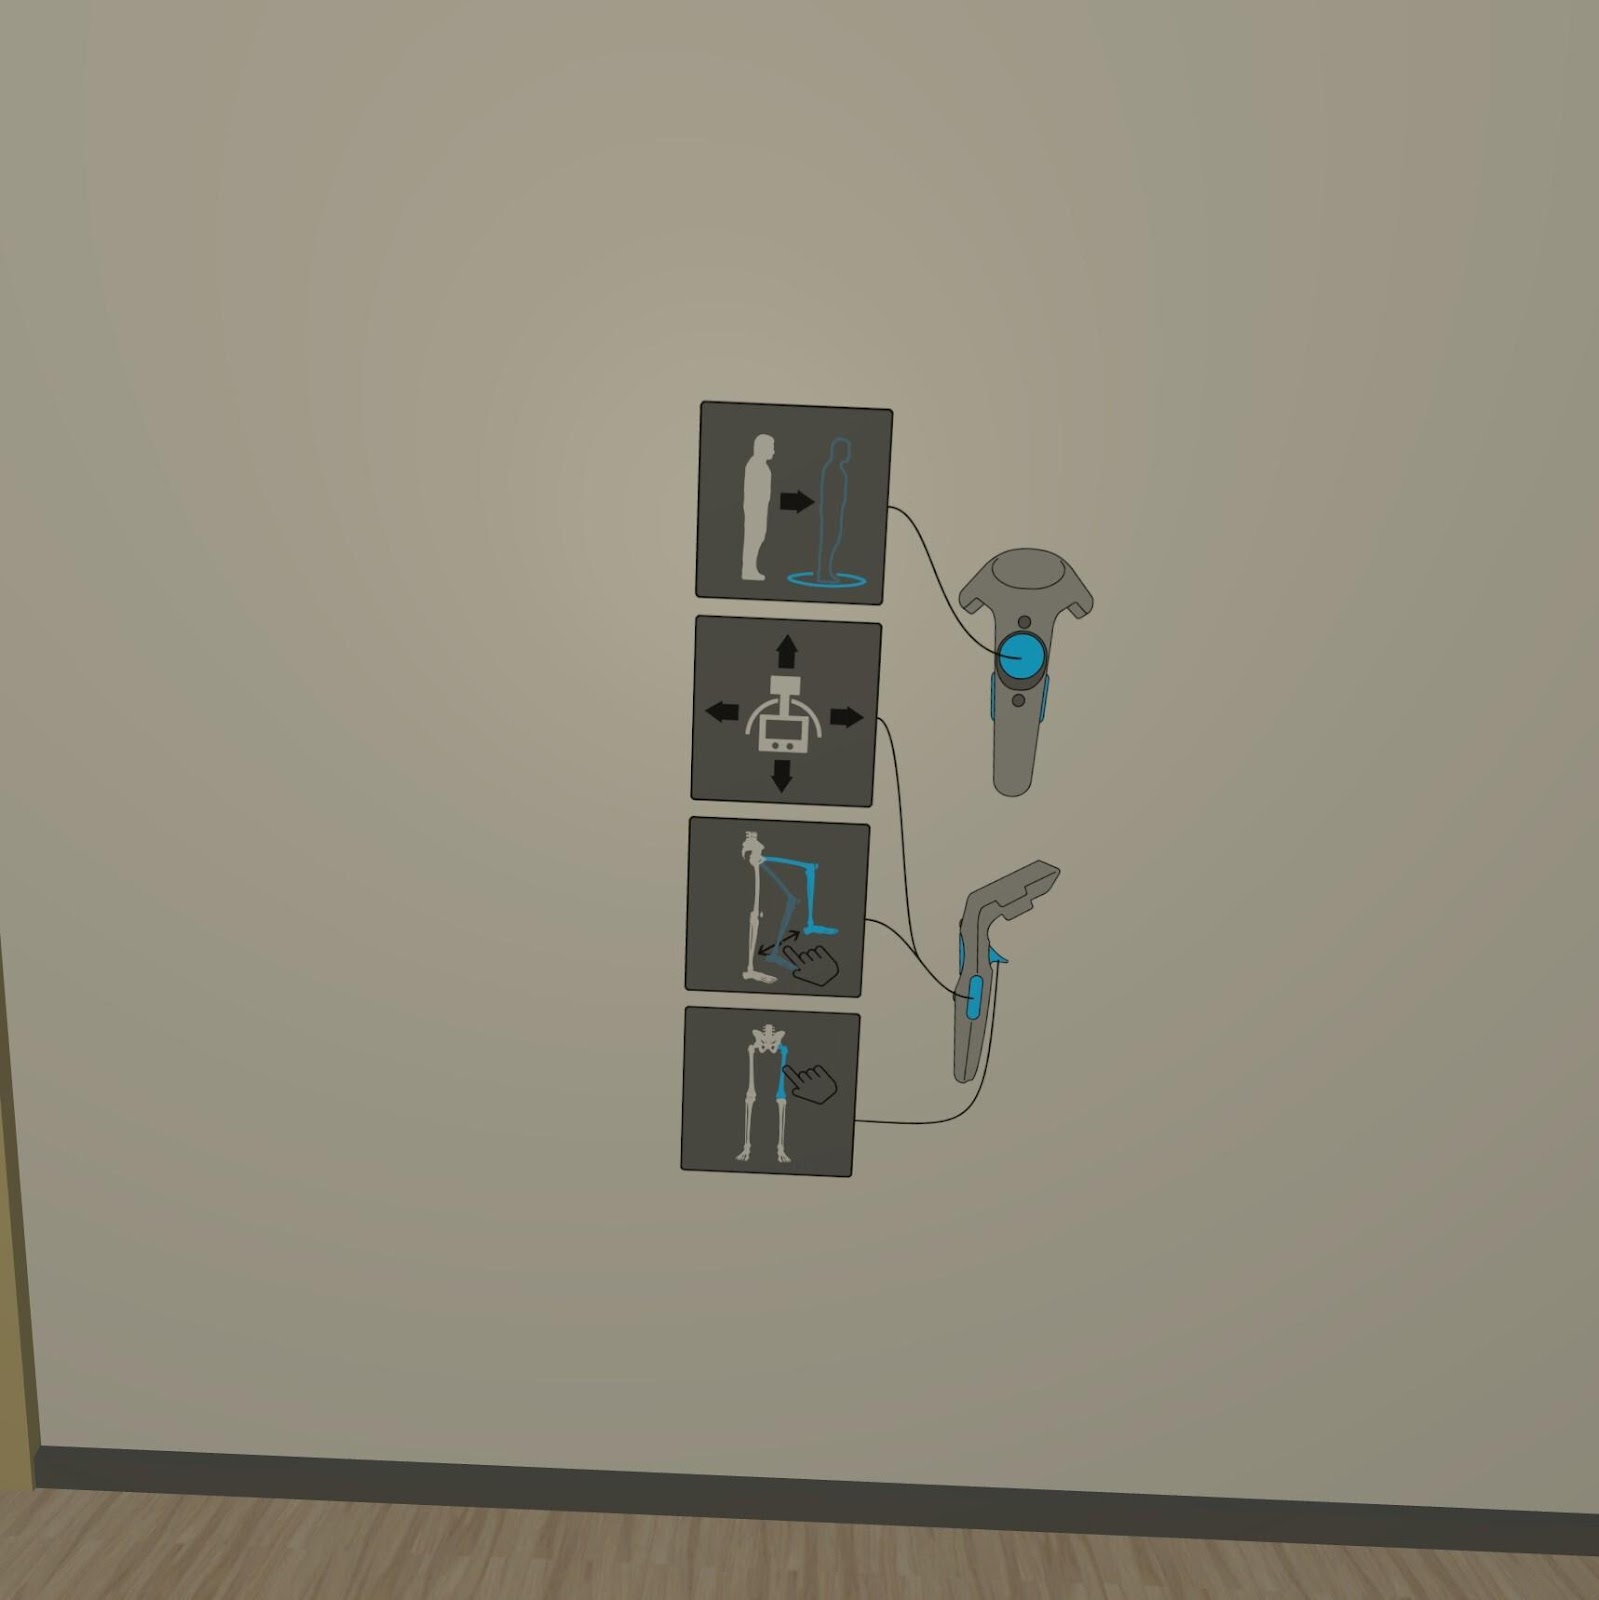
VR & Desktop Controls
Control mappings may vary depending on your VR headset model.
Posters displayed on the walls within the VR environment show the button functions specific to your device. Please refer to these when getting started. If you need further assistance, contact us at: support@virtualmedicalcoaching.com
Below is an example for the HTC Vive and HTC Vive Pro
HTC VR Controller Functions
These controls may vary depending on your VR headset model. Please spend a few minutes getting familiar with your controllers before starting the simulation.
2D/Desktop mode:
Windows
Mac

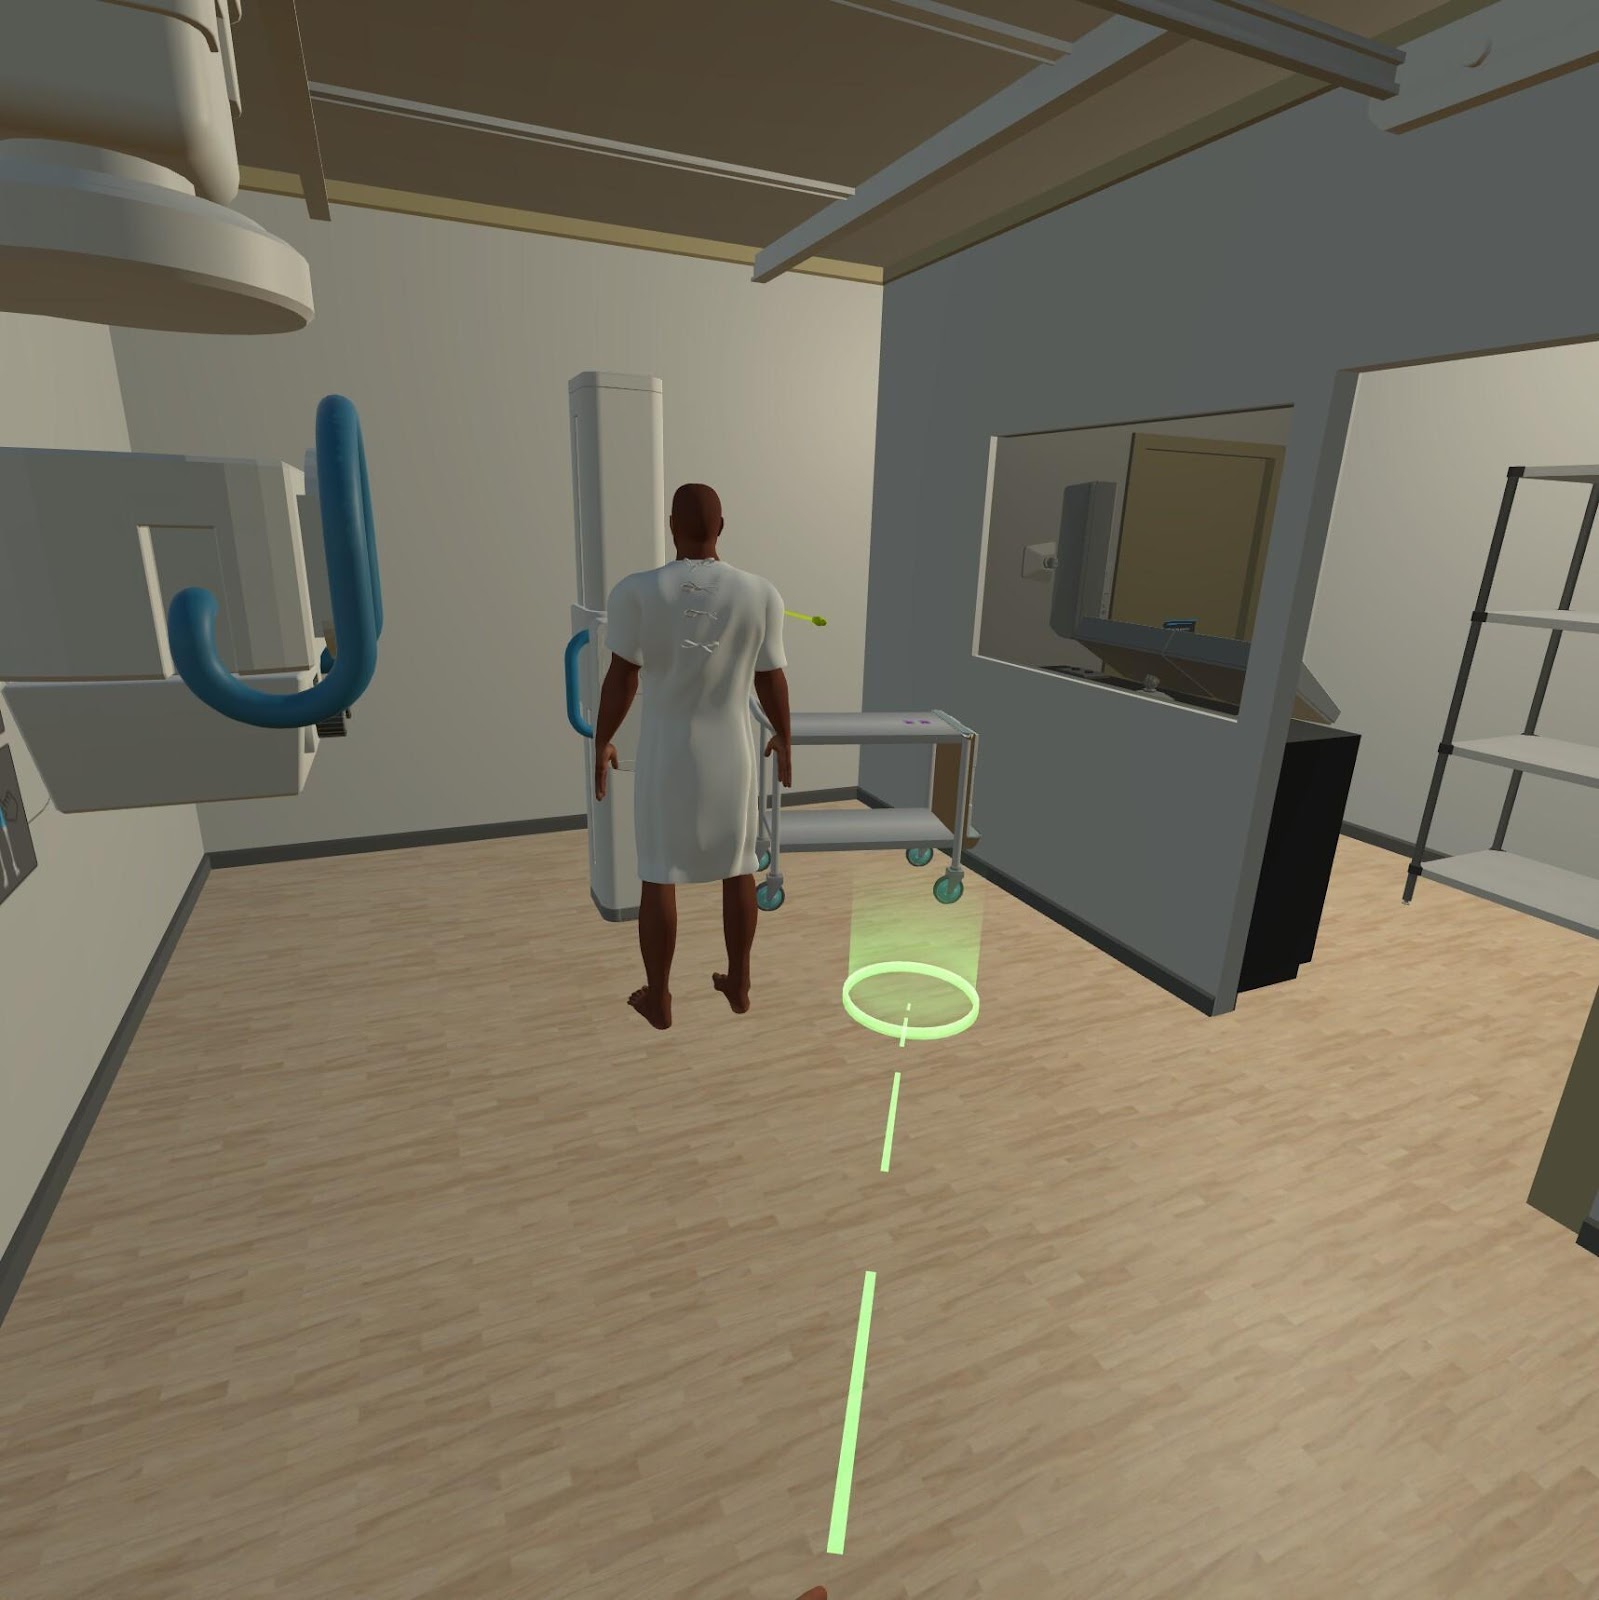
VR Navigation – Teleport Function
Teleporting allows you to move around the virtual environment without physically walking, making it ideal for use in limited spaces, or you can do a mixture of both.
To teleport:
If the circle appears red, teleporting to that location isn't possible. This usually means you’re aiming at a wall, equipment tray, or other restricted area. Try pointing at a clear space on the floor instead.
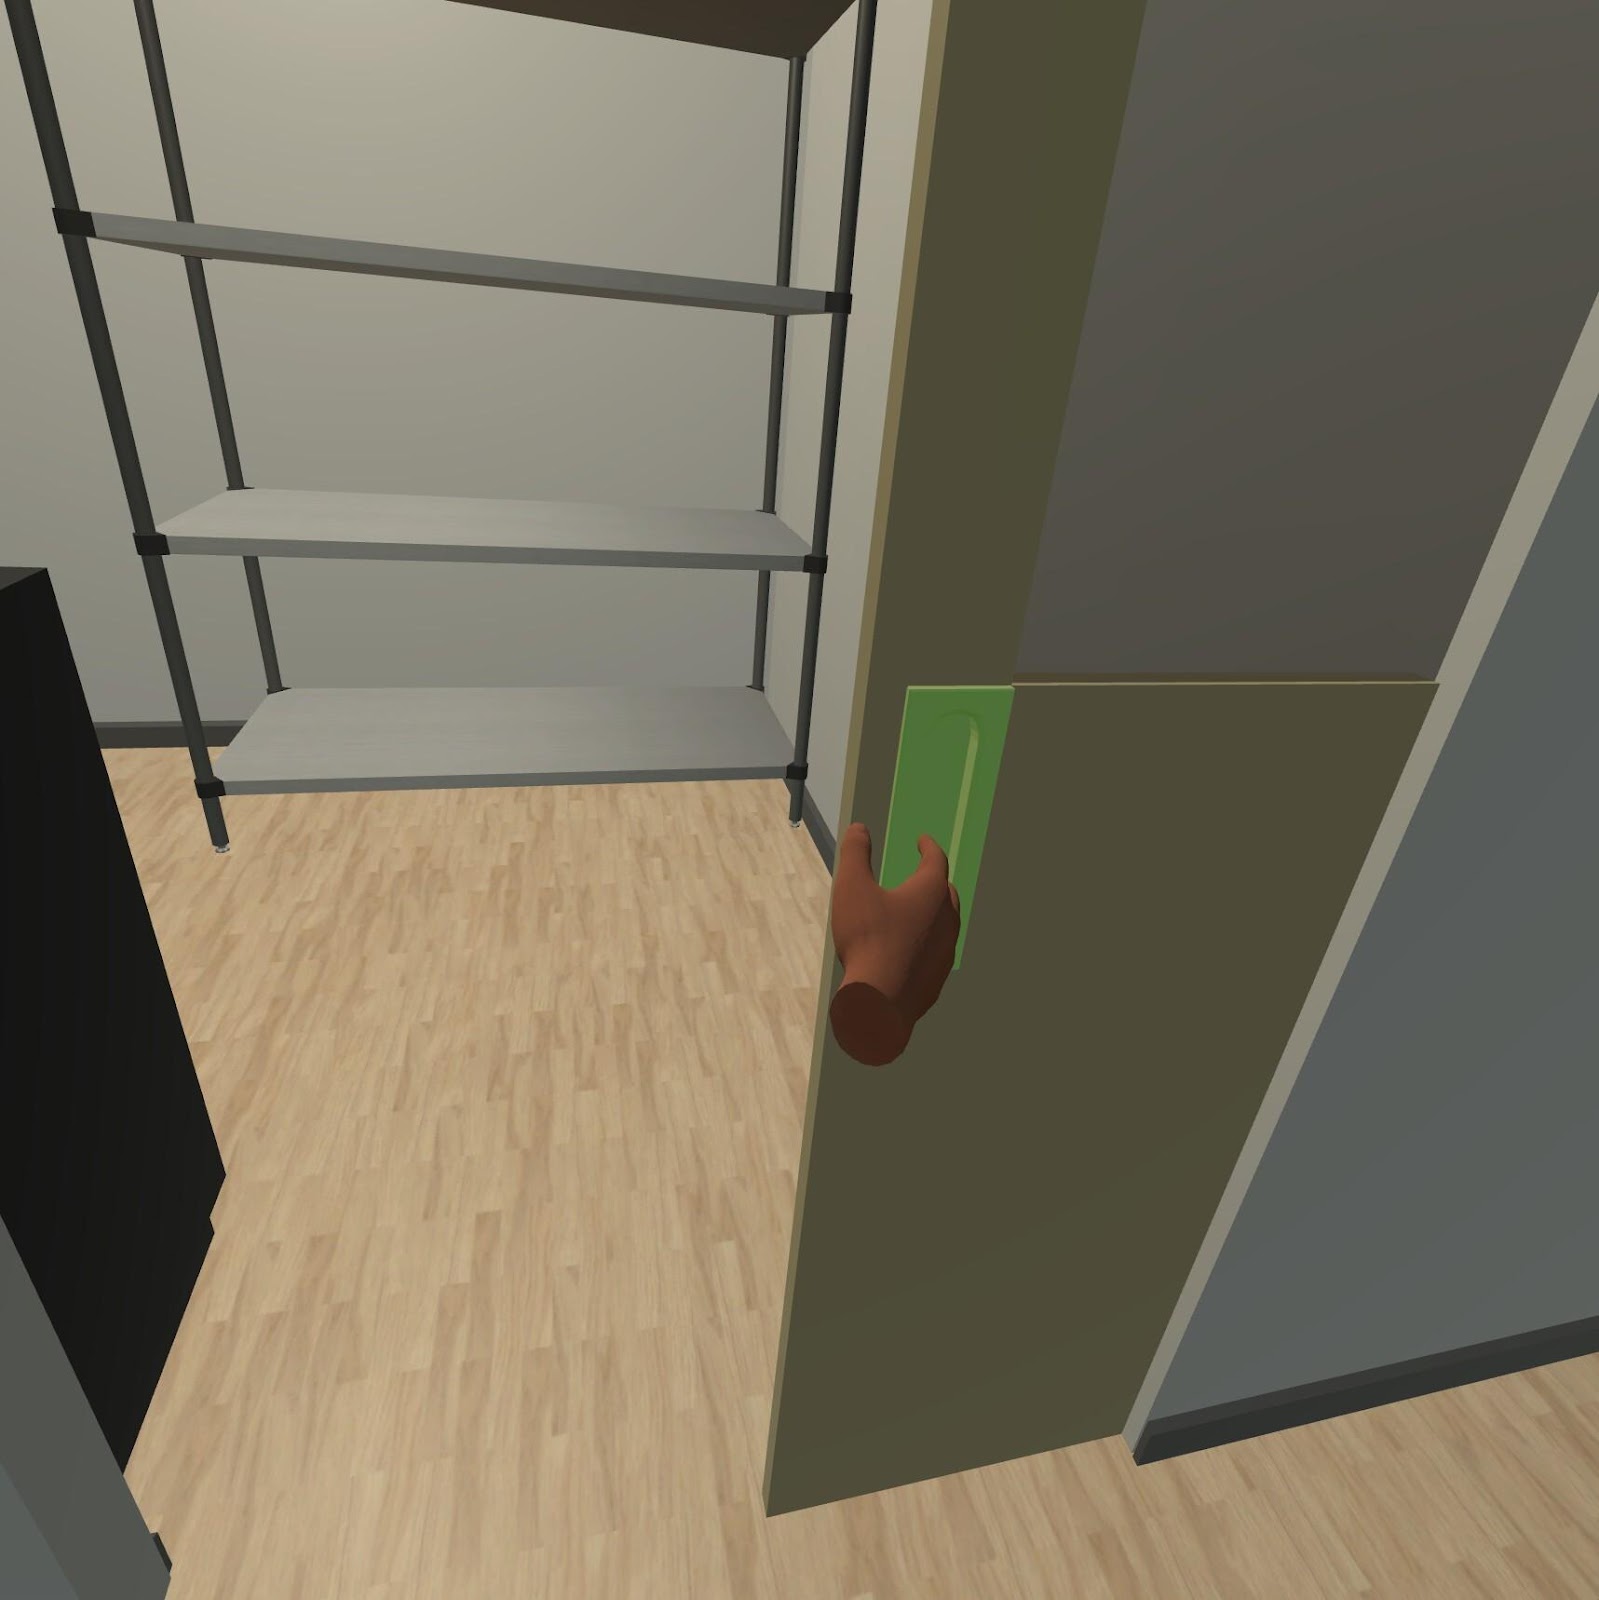
VR Interaction – Grabbing and Moving Objects
The grabbing/gripping function lets you interact with equipment and position the patient within the virtual environment, just as you would in a real clinical setting.
To grab or move an object:
This function is used for:
These actions mirror real-world tasks and help reinforce correct clinical technique.
VR Interaction – Pointing and Pressing
The pointing function is used to interact with buttons and explore anatomical structures in the virtual environment.
Highlighting Skeletal Anatomy (VR only):
To view the underlying skeleton, point at the skin and press the skin using your controller. This will highlight the corresponding internal anatomy, helping you connect external landmarks with internal features.
Important: The anatomy will not appear automatically. You must actively point and press to reveal it.

Interacting with Equipment
Use the pointing function to press buttons on monitors and medical equipment throughout the simulation.
Some actions, such as pressing buttons, may trigger automatically when your hands are brought close. However, for most equipment, you’ll need to point and press to interact.
In 2D, the manipulations and movements are activated by clicking on the user interface in the icon tray.
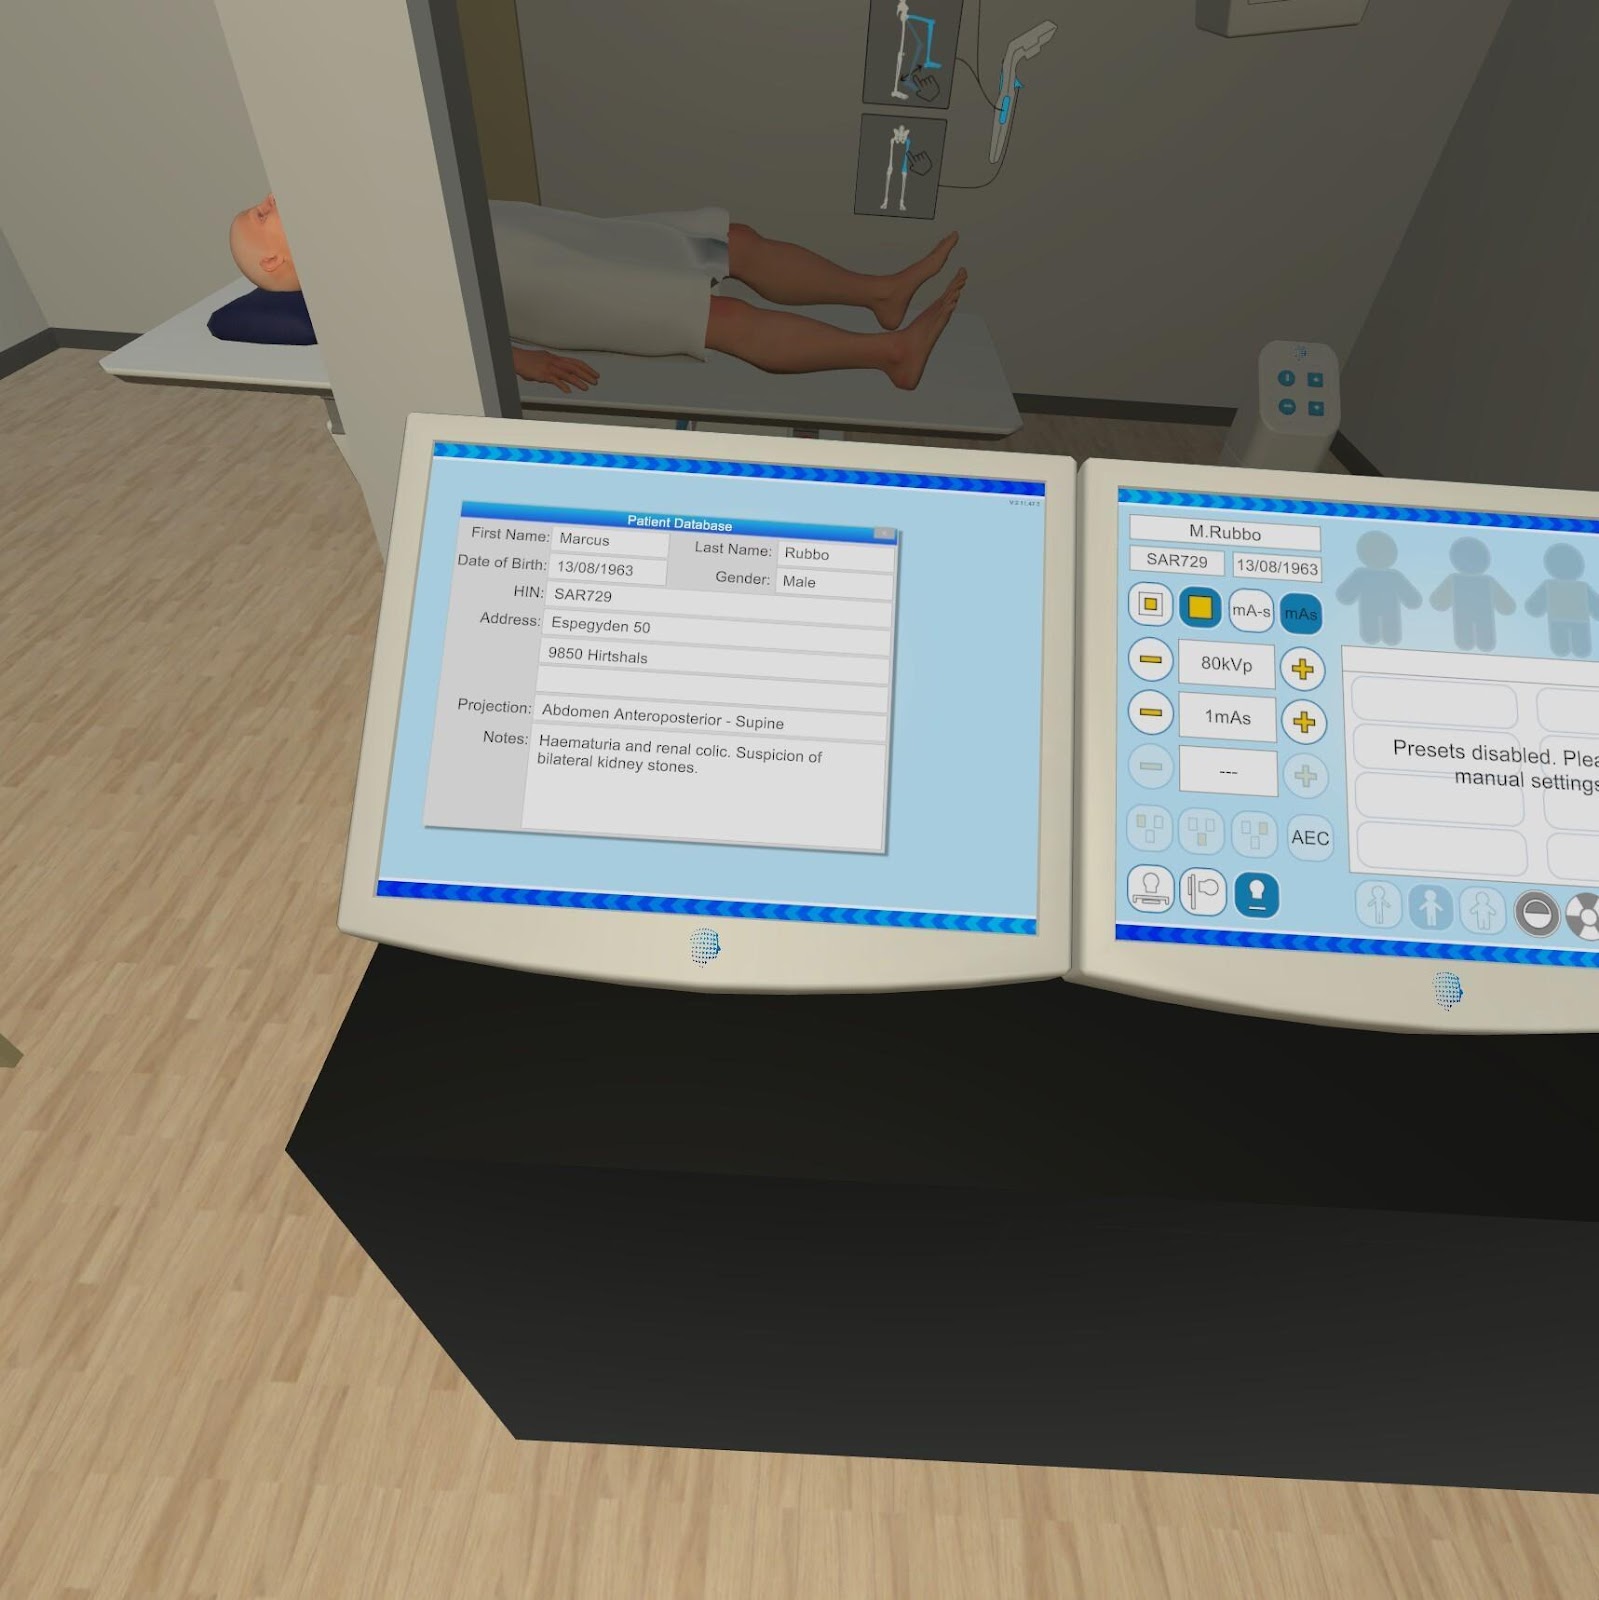
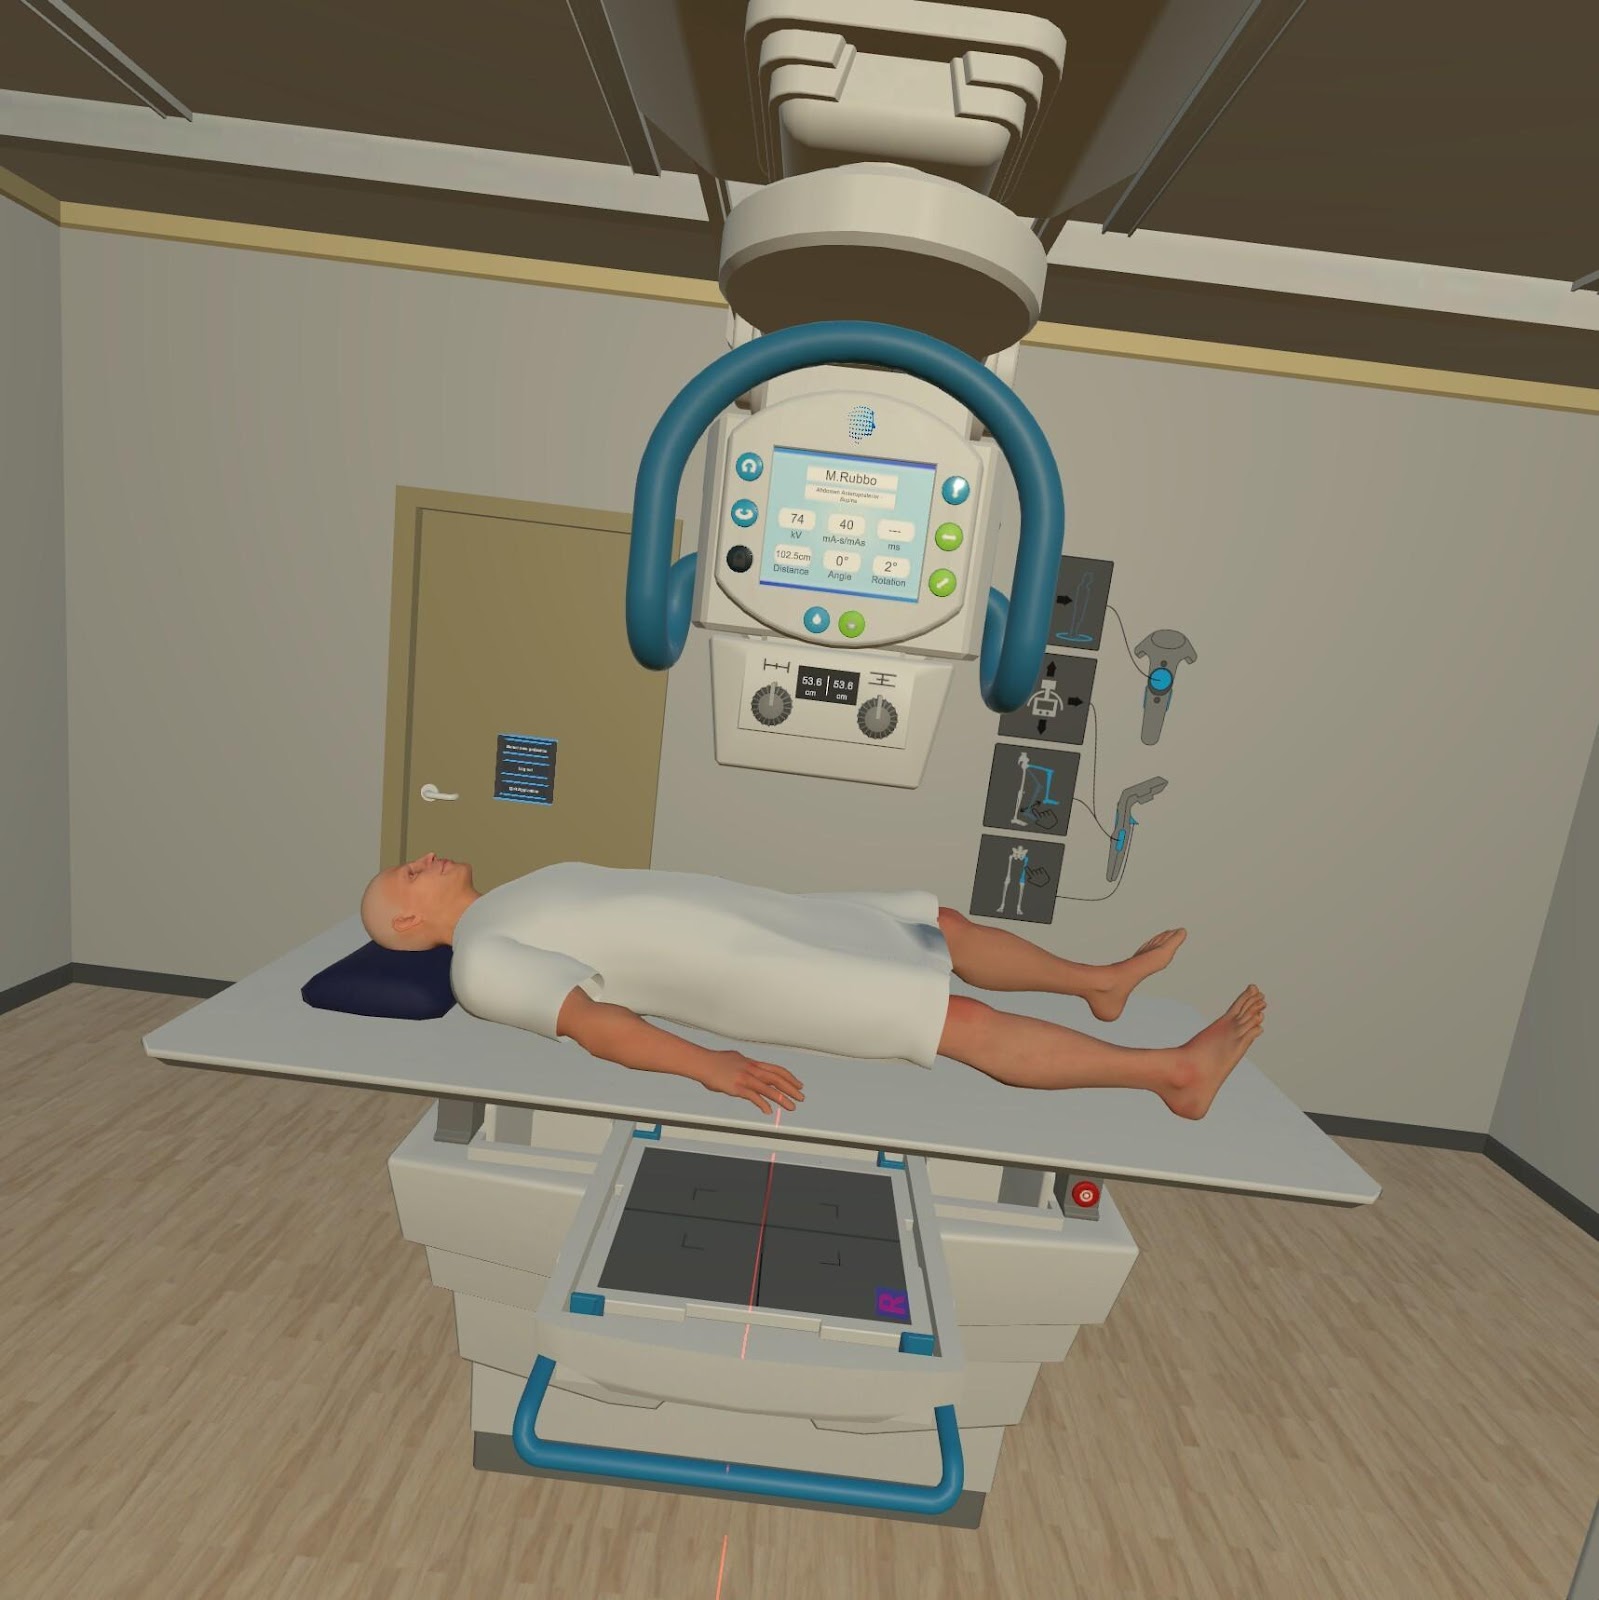
In this view, you can check the patient's identification and ensure the clinical notes make sense for the projection. In VR, you should also start your simulation in the Radiography Control Room.
At the top right of the left-hand monitor, you can see the version number of the software you are using. This number should always match the number in the Downloads section in the VMC User Portal. If it does not, it’s time for an update. You can do this yourself on your own computer, or please let one of your instructors or the ICT team know.

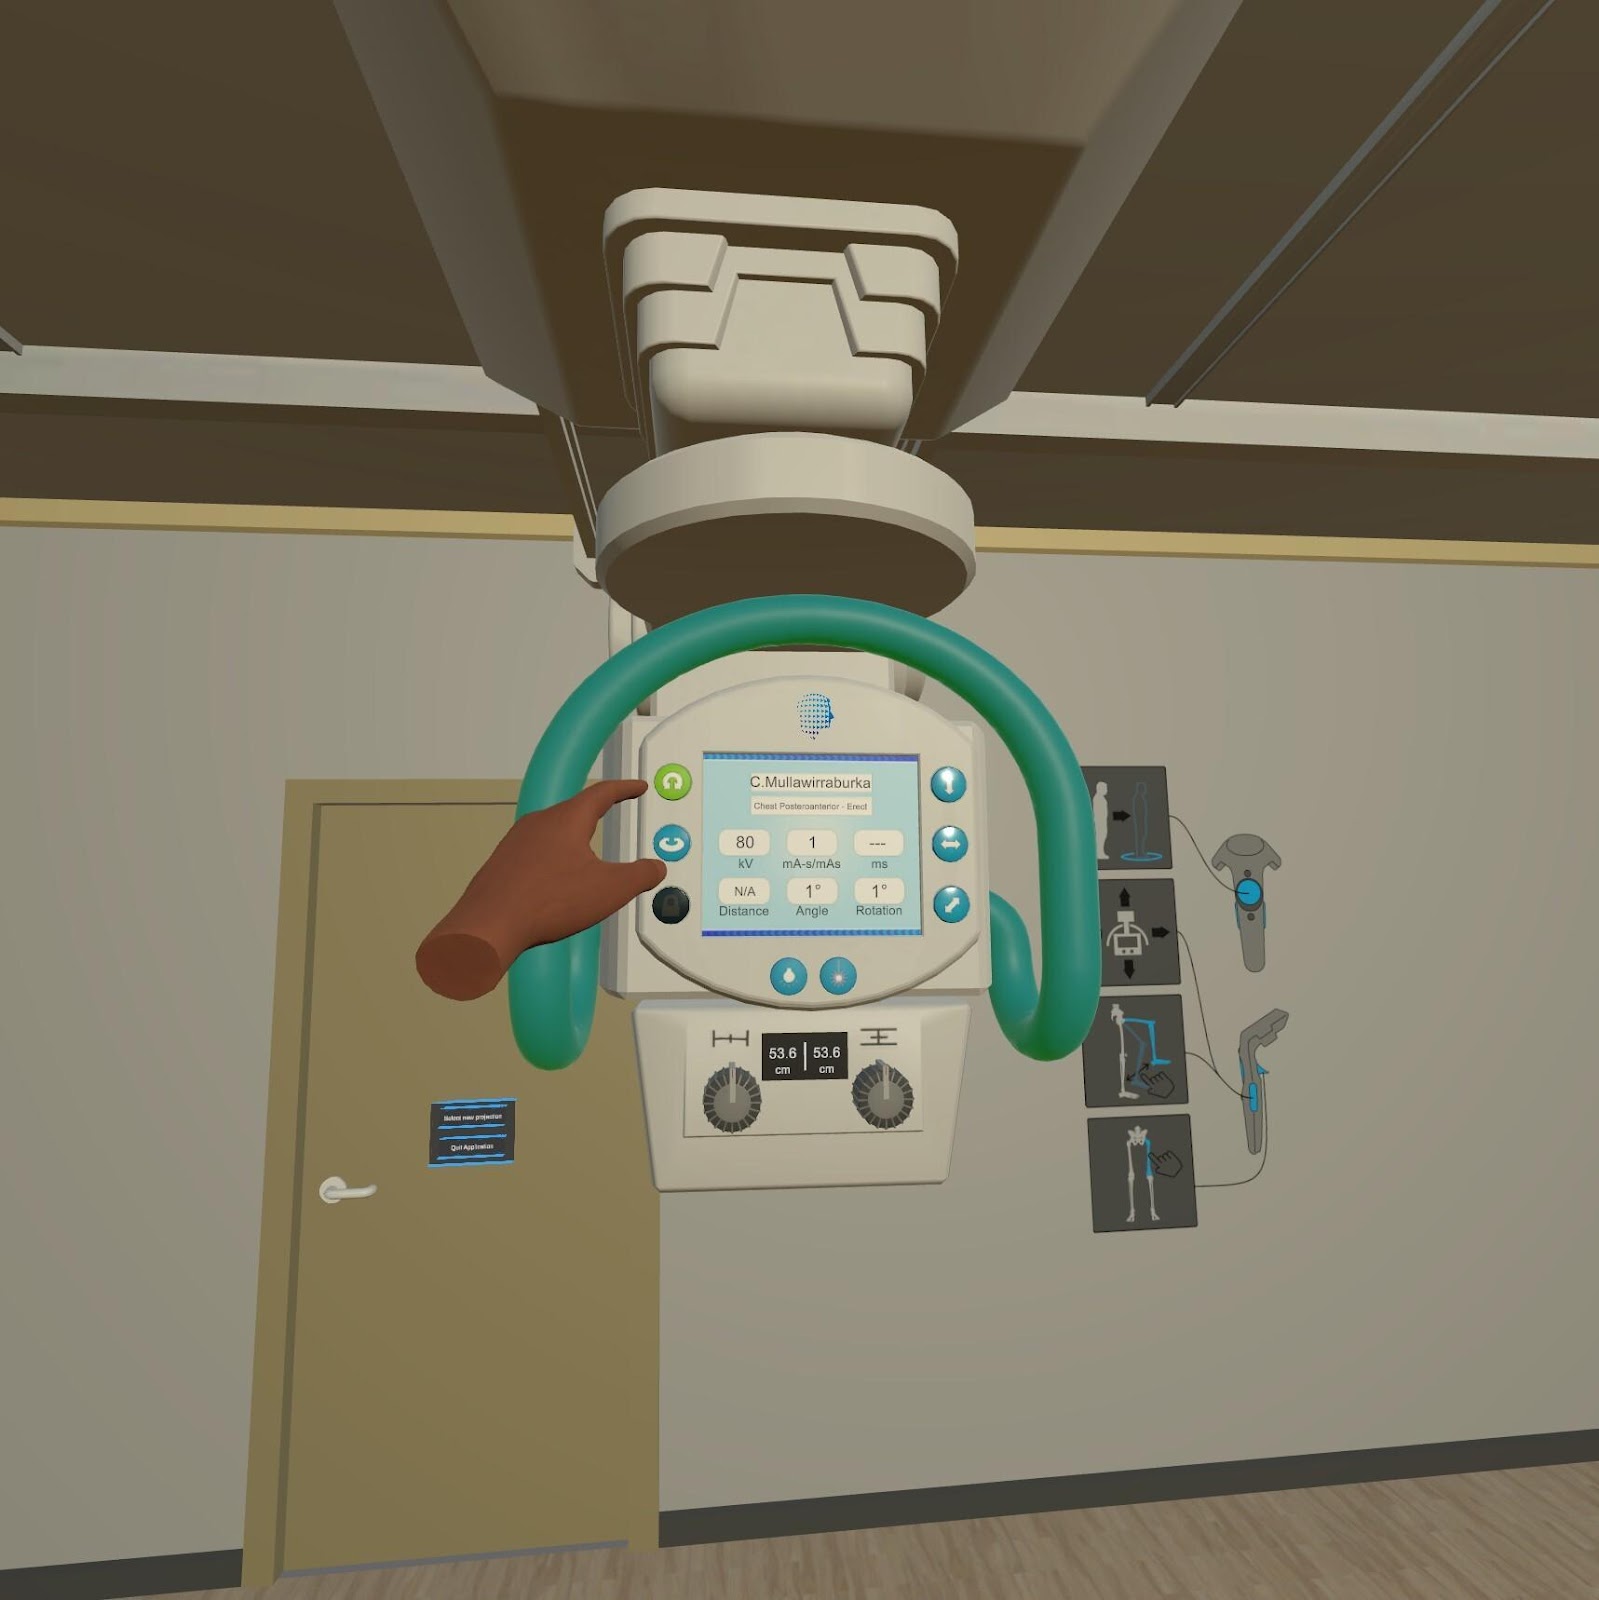
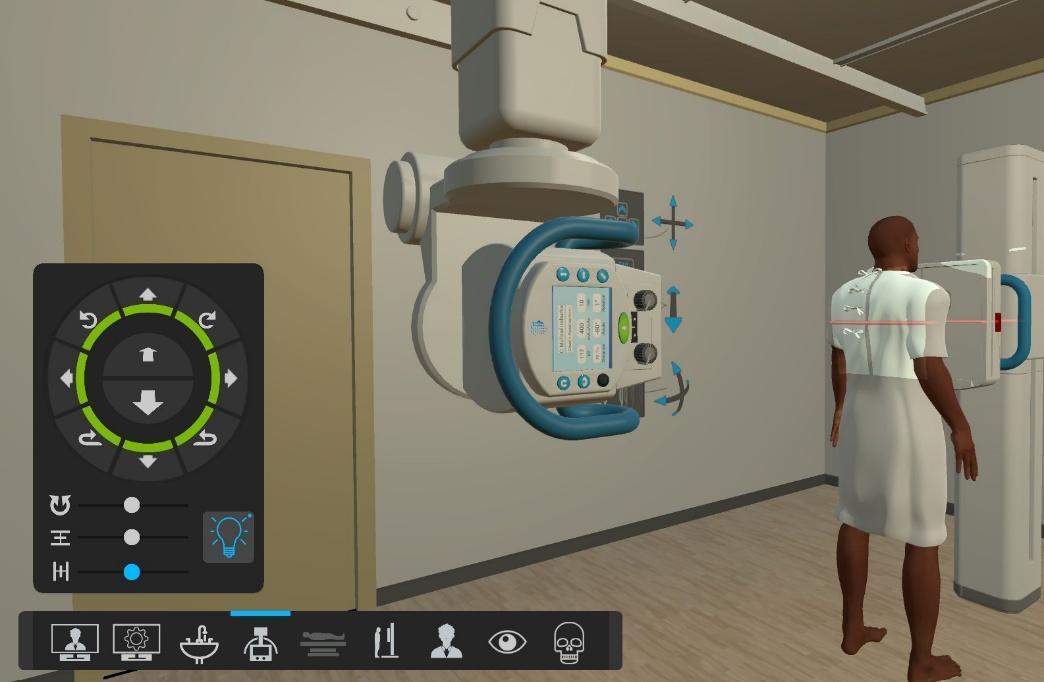
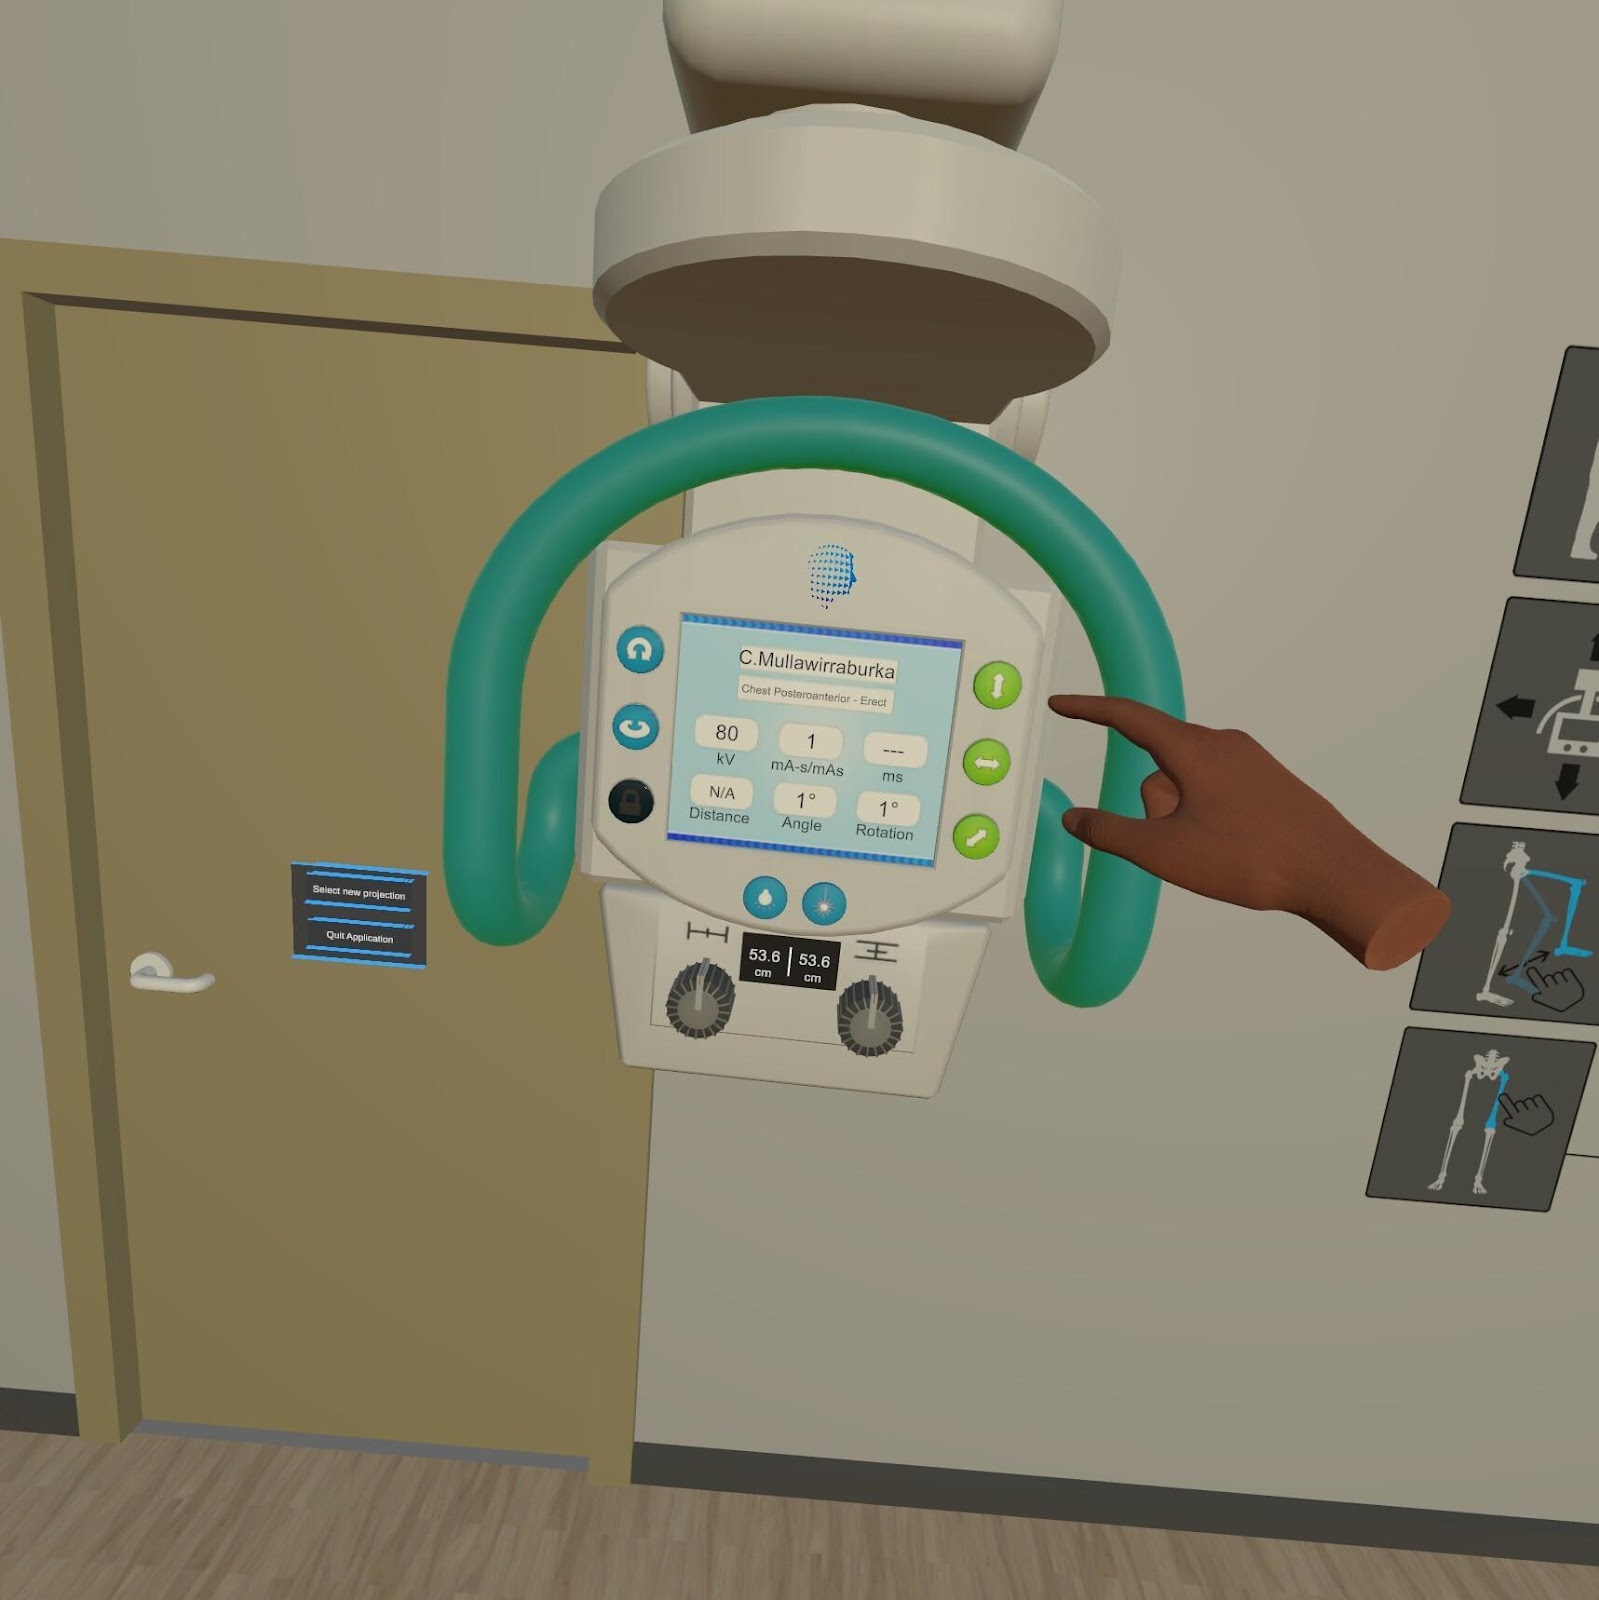
Whether you are in 2D or VR, the right-hand blue monitor is where you select your exposure and other technique factors.


You can select a preset or manually adjust your kVp, mAs, focal spot size, AEC on or off, AEC chambers and density, and detector. Or do a mixture of both.
Important:
Always select your detector before positioning the X-ray tube or Bucky.
(There’s more about the green lights later in the guide.)
For a very short video on this, please watch this: https://youtu.be/vrCMeWtrInc
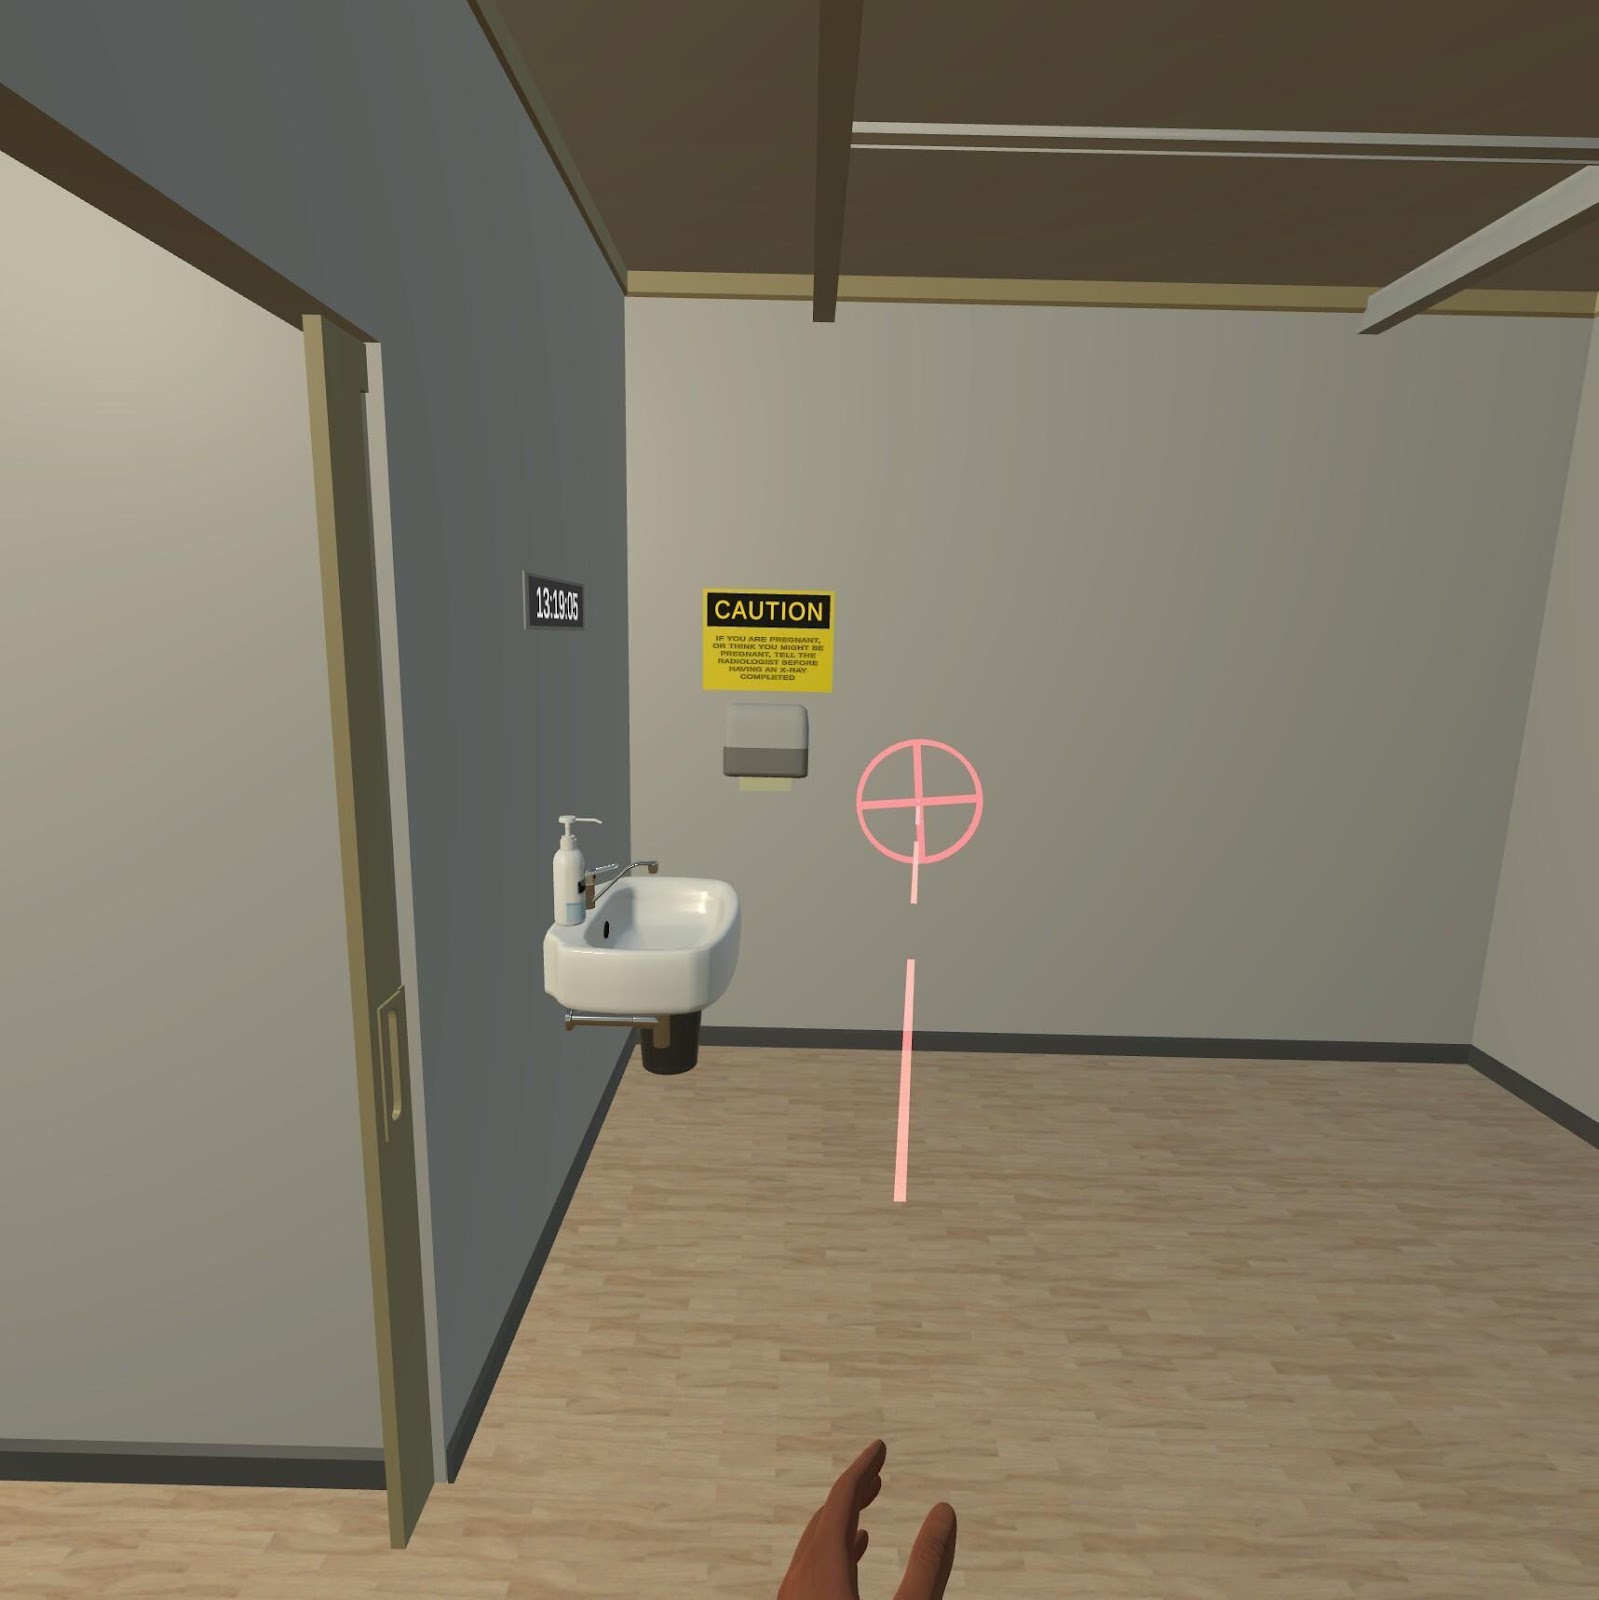
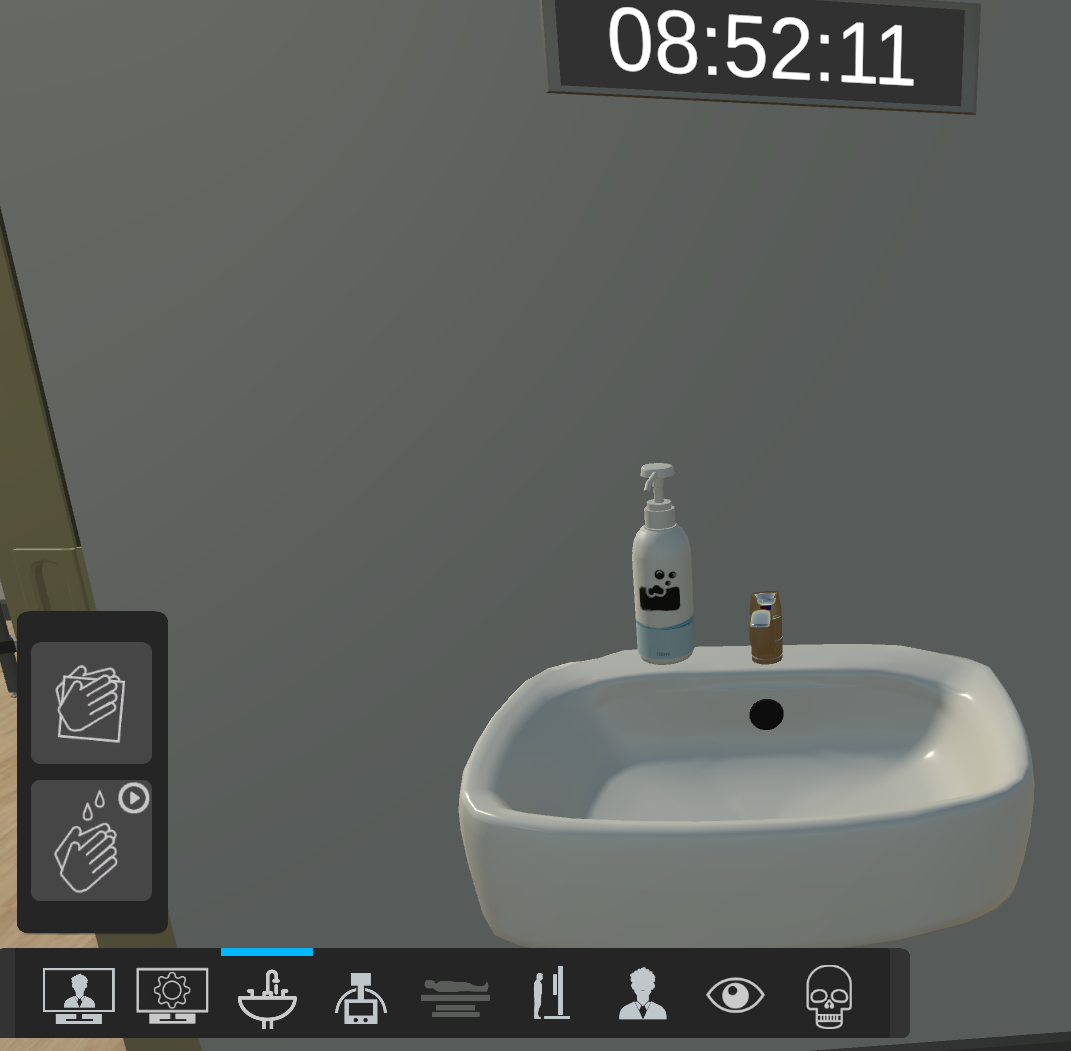
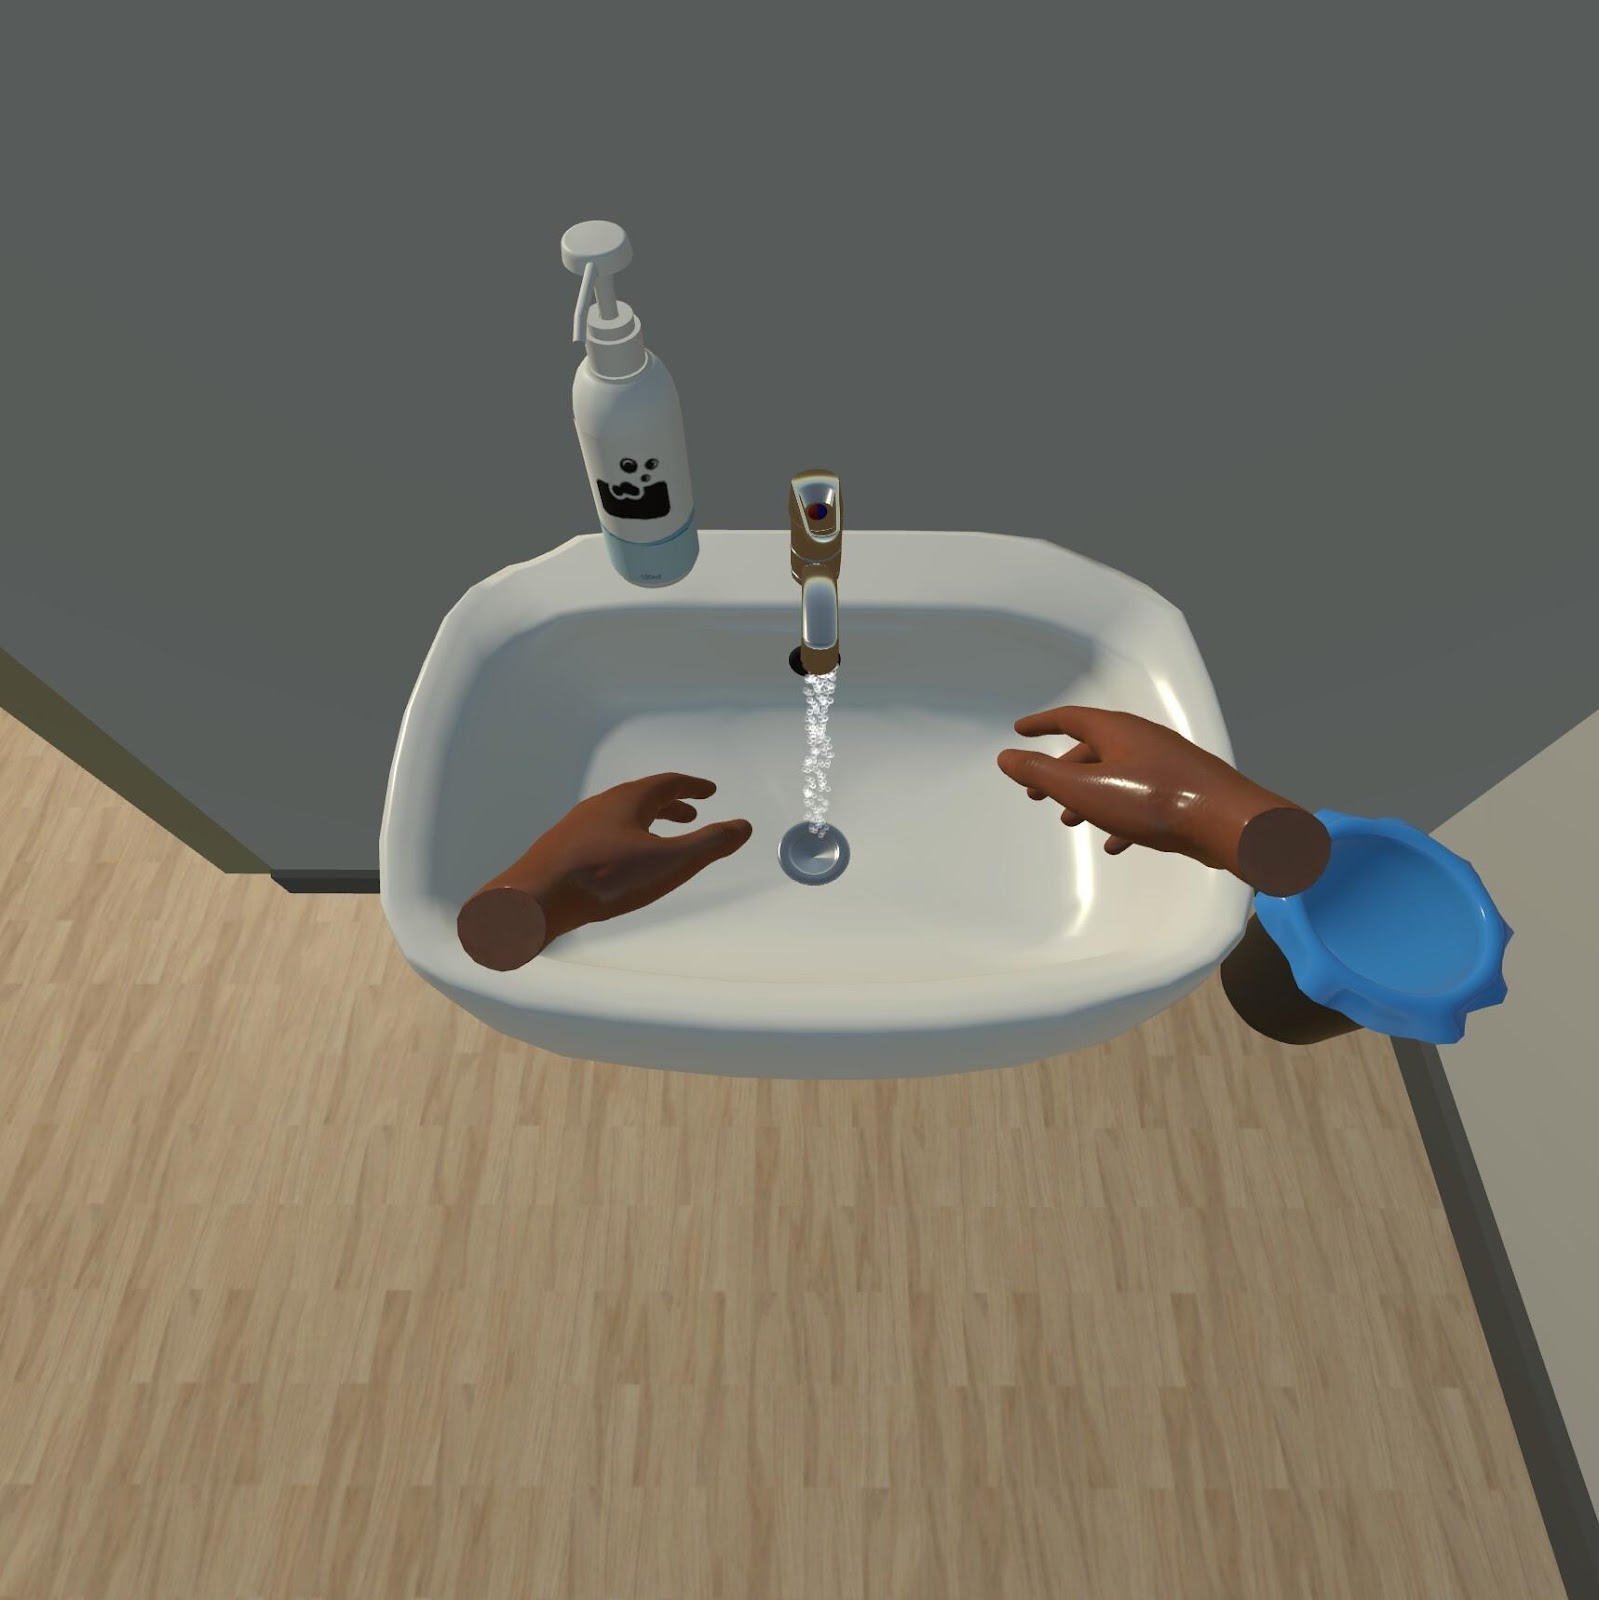
Handwashing
In 2D Mode:
Click the faucet/basin button to initiate the handwashing sequenceThis automatically plays an animation designed to reinforce correct hand hygiene before and after each examination.
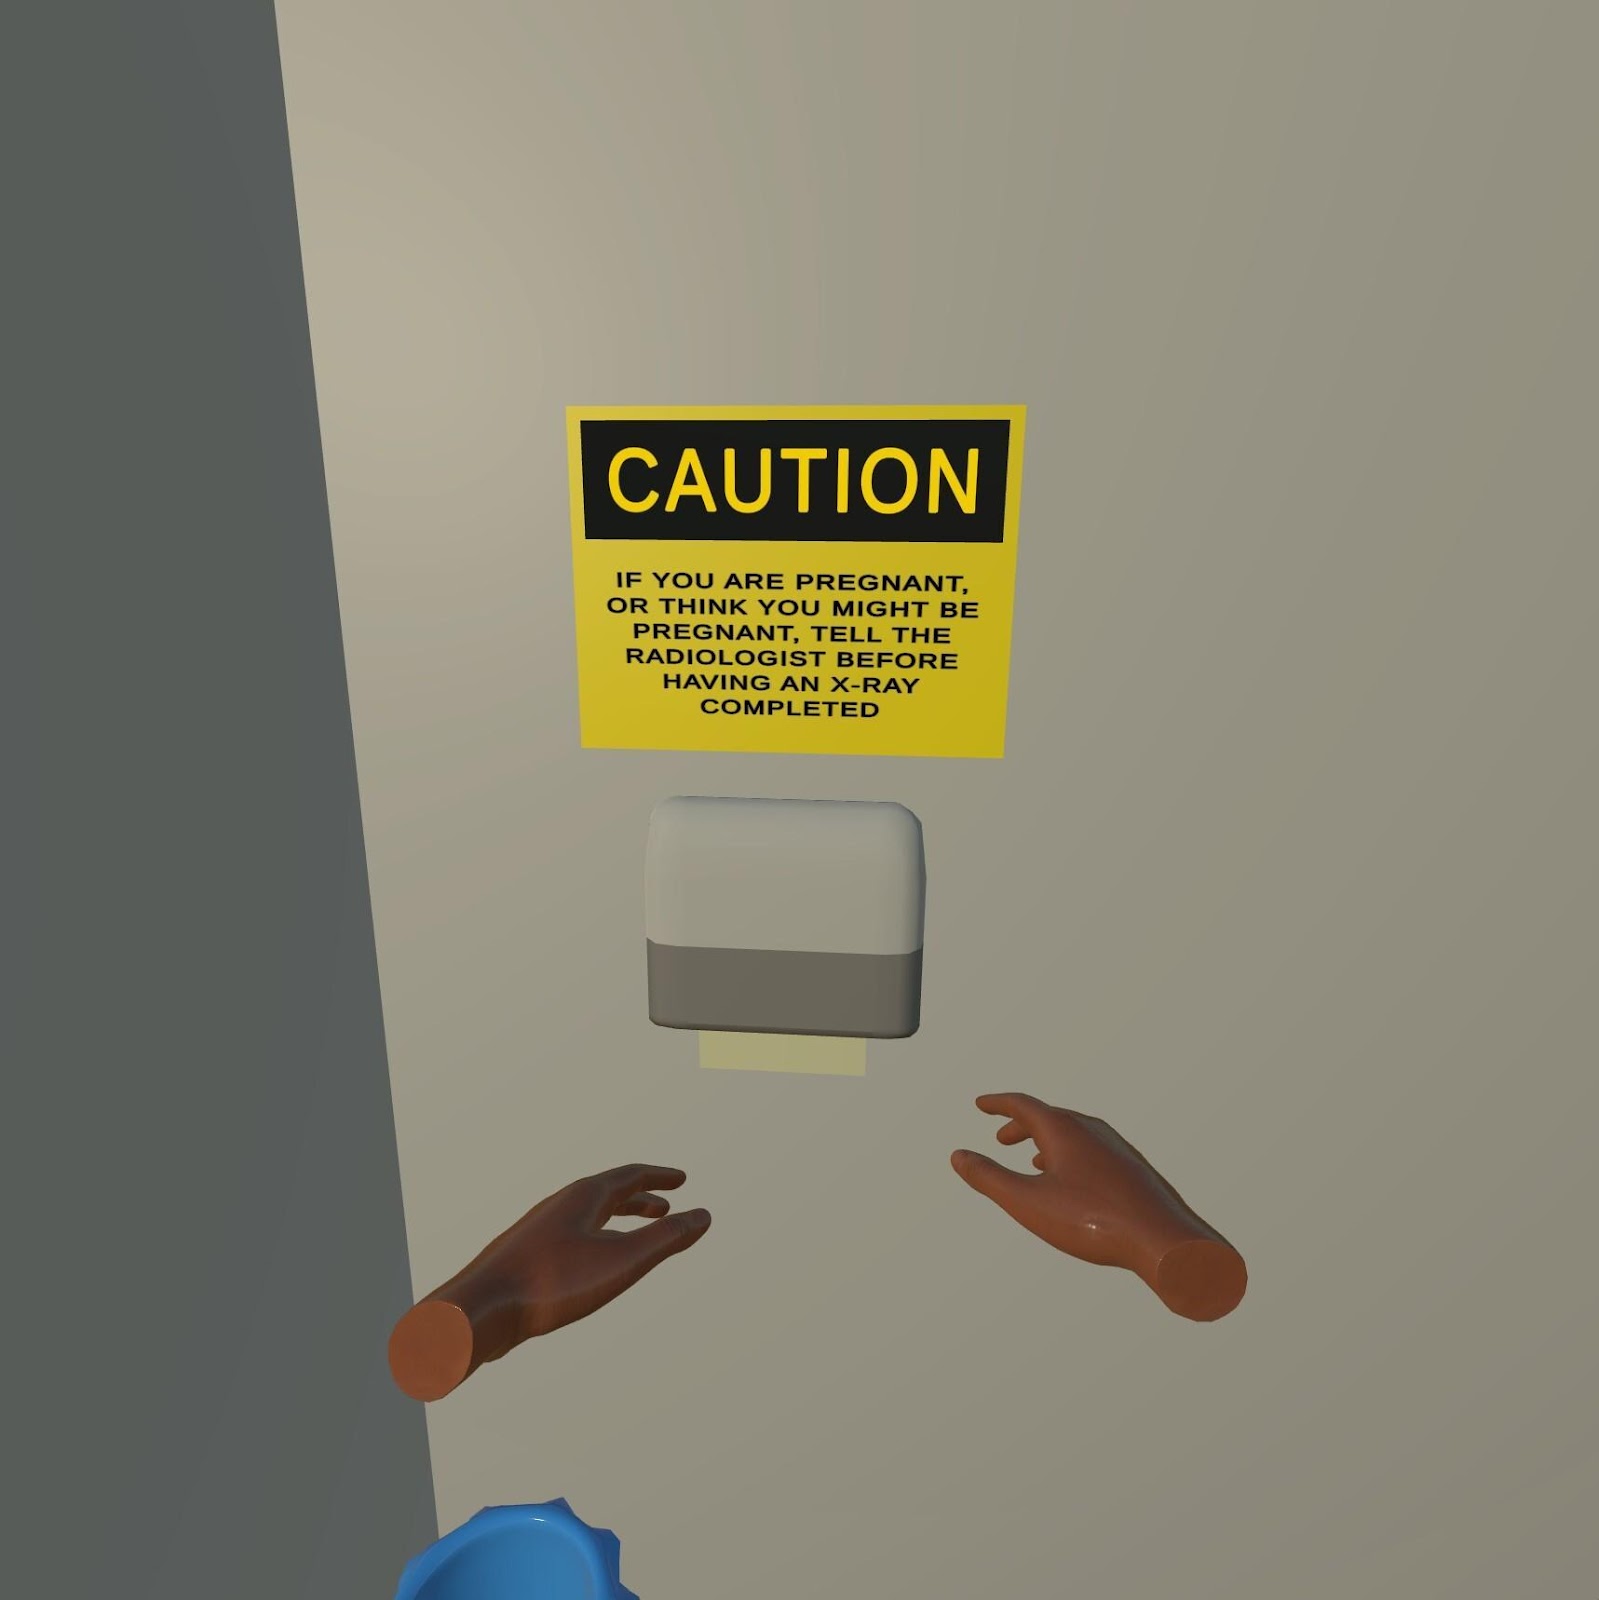
In VR Mode:
The paper towels are located on the wall beneath the Radiation warning sign
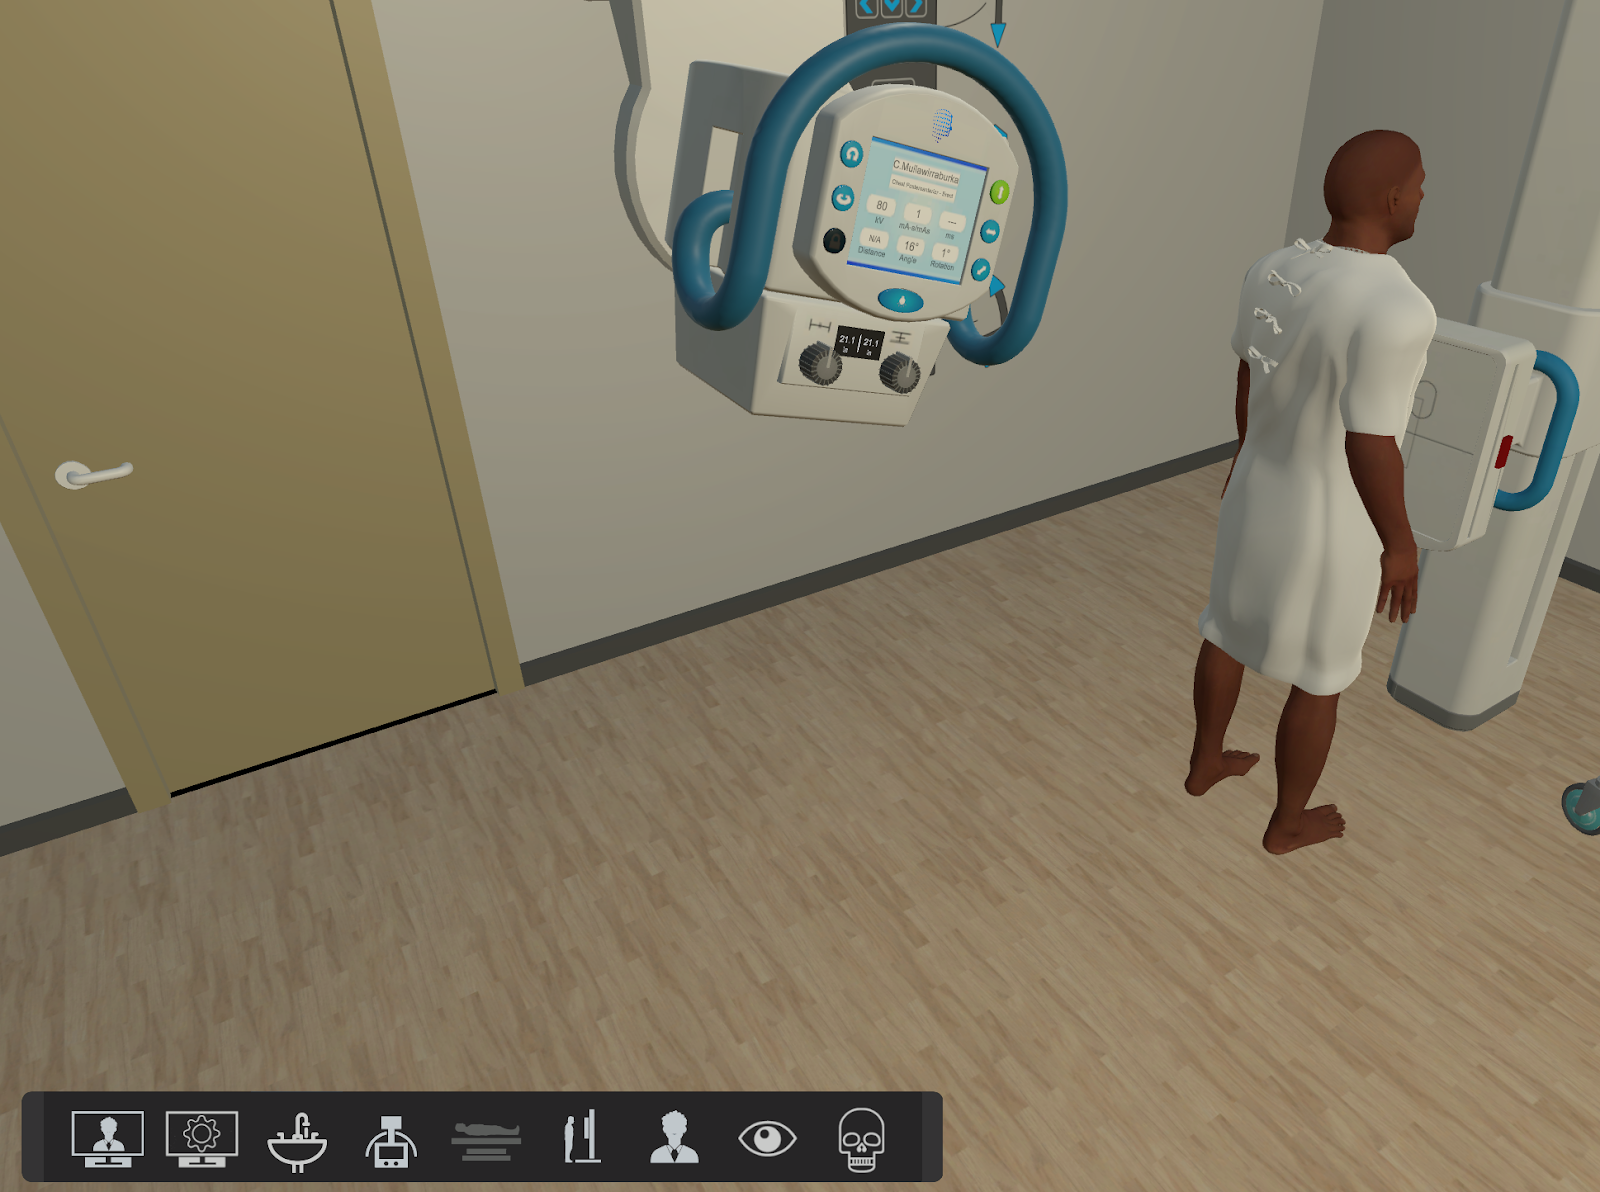
Once your control panel is set up, you can navigate to the clinical room and begin to adjust your X-ray tube. Or walk/teleport into the room in VR.
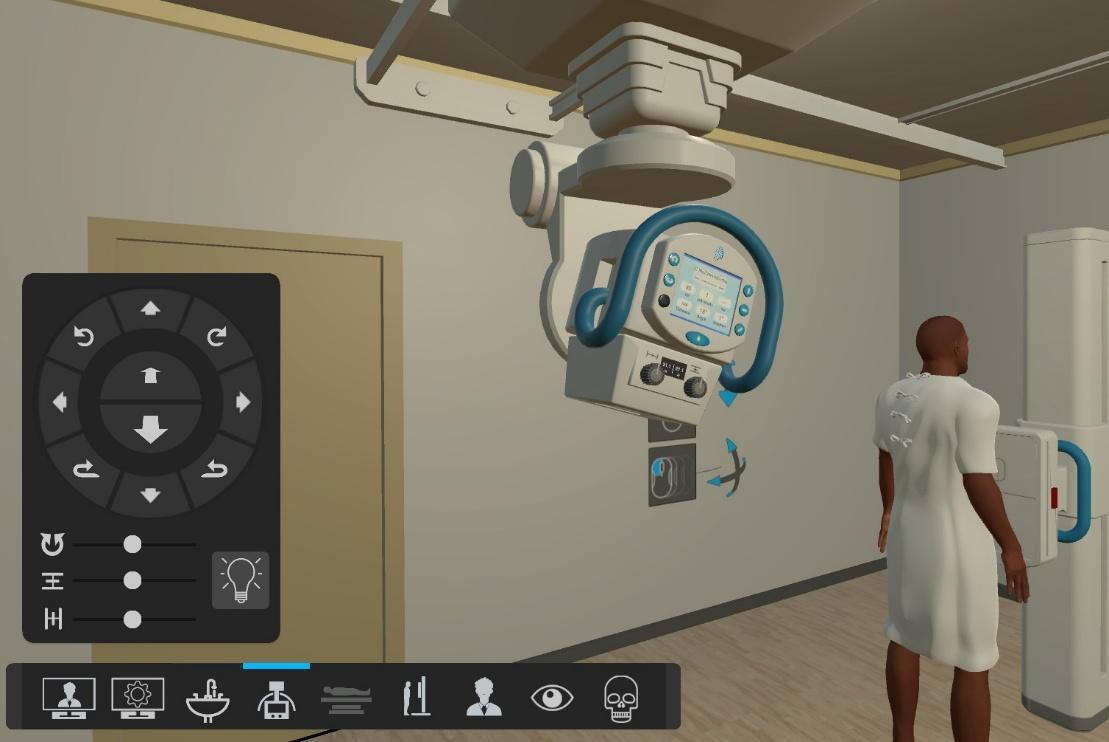
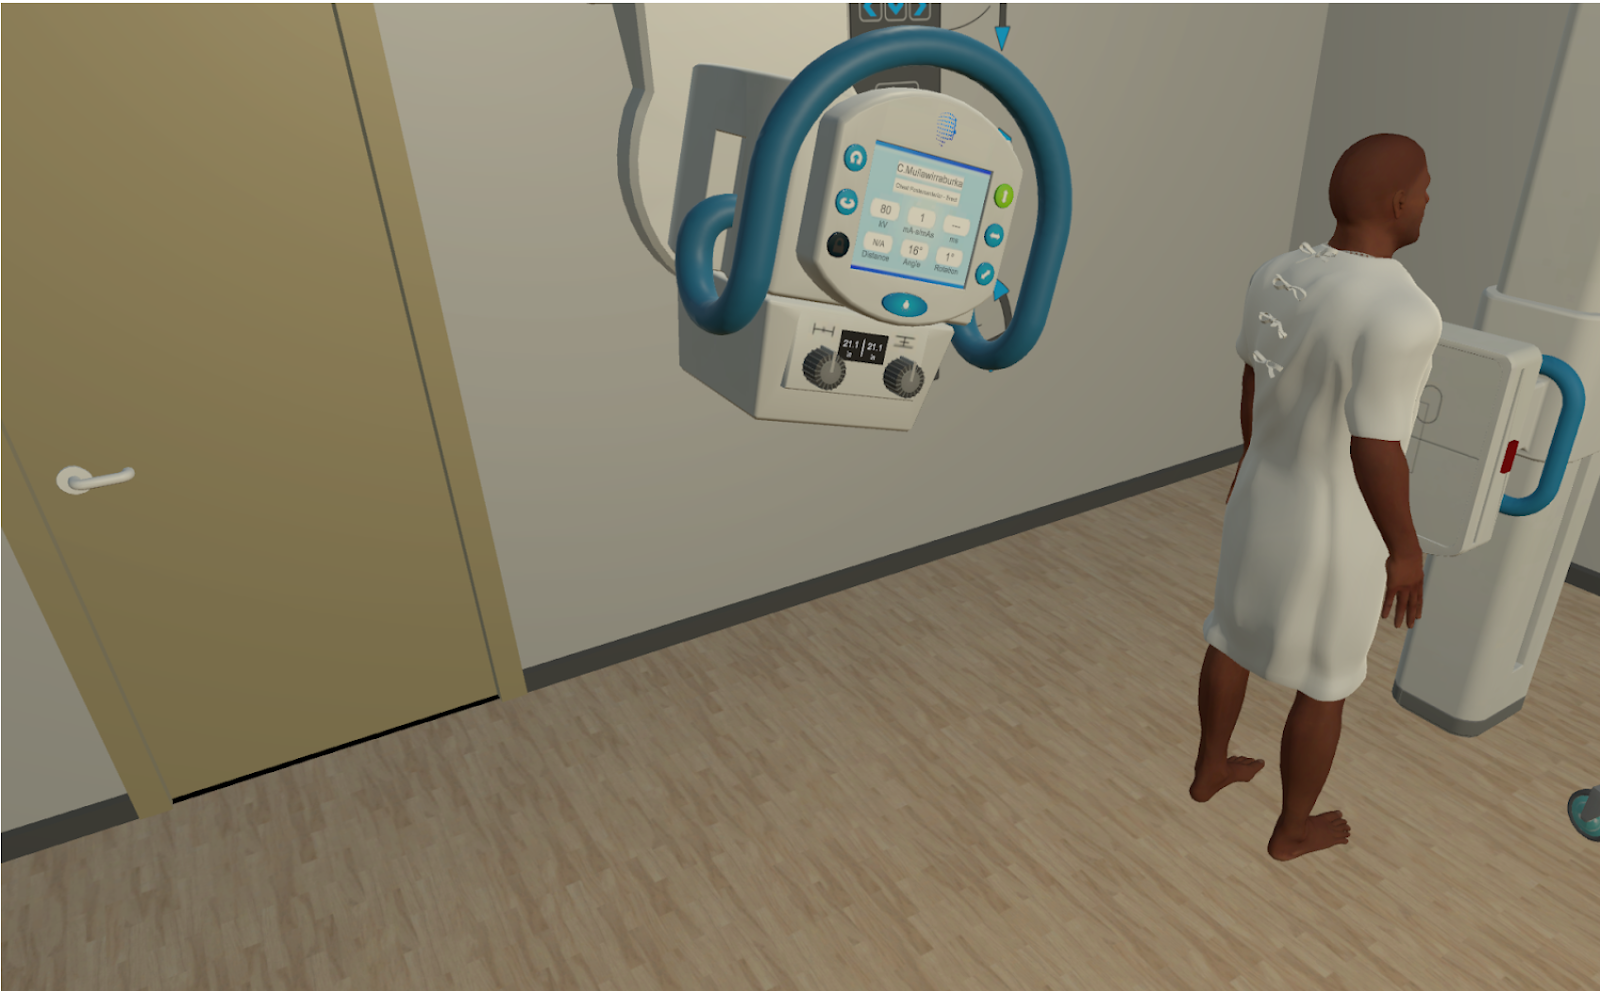
In VR, you will notice all the X-ray tube directional buttons are locked (blue) except for the vertical button when you first log in. This is green; therefore, you can move the tube up and down, but in no other direction.
Once you tap the other directional buttons so they go green, you will be able to move the tube in those directions, including turning all of the directional buttons green so you have a “free tube”. Note: only one rotation direction (left-hand side) can be used at a time.
Note on 2D Tube Directional Controls
The directional buttons for the X-ray tube behave differently depending on whether you are performing erect or supine projections. While the function of each button remains consistent, the direction of movement may vary with patient positioning. Always observe the on-screen tube indicators to confirm the direction of motion and adjust accordingly.

In VR, if you have set up the correct detector/Bucky on the control panel, you will be able to feel the X-ray tube lock into the appropriate detent.
In 2D, you should look for the green lights when the tube and detector/Bucky are aligned. These lights appear on the X-ray tube controllers and the erect detector controller.
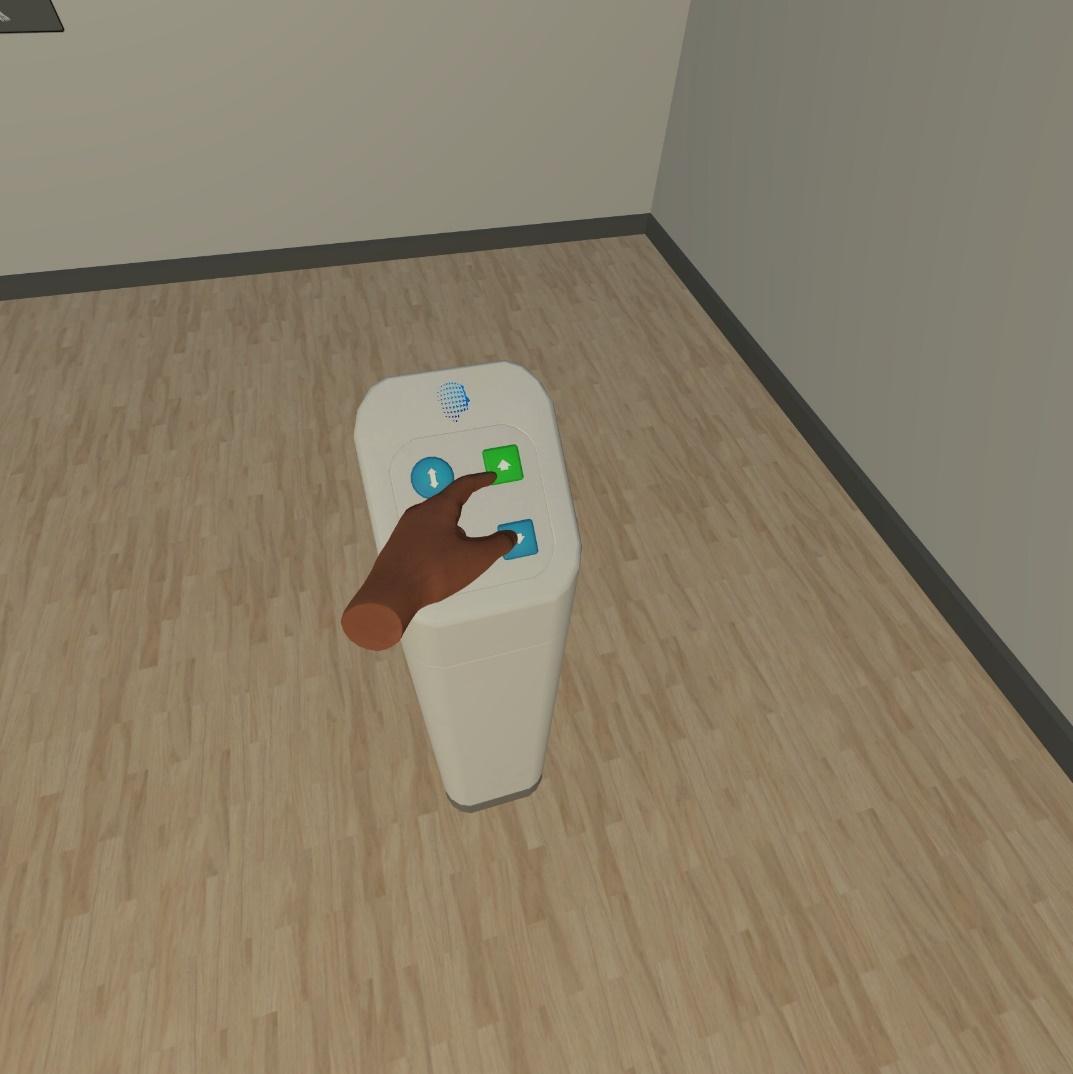
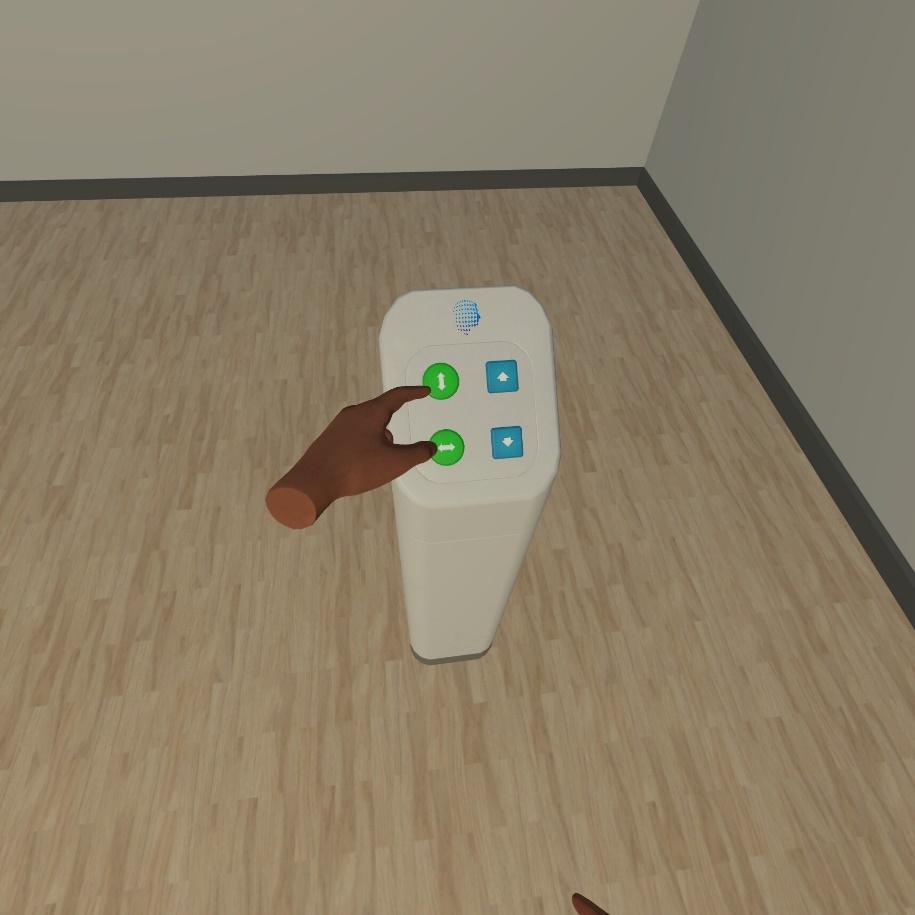
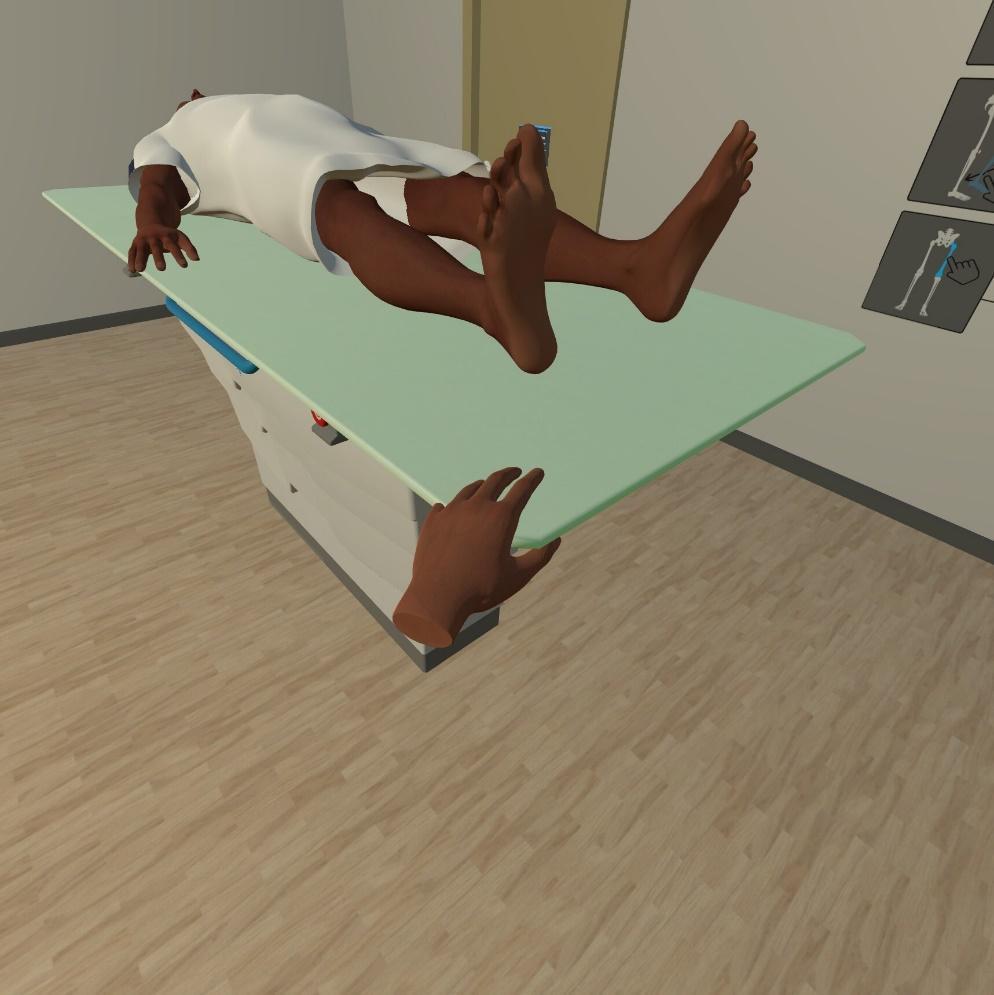
Adjusting the X-ray Table in VR.
To raise or lower the X-ray table, point at the square up or down buttons on the vertical post at the end of the table and press to adjust the height.
Using the Floating Top Table
The floating top function is activated using the circular buttons on the same post as the height controls.
The table will highlight green to indicate that movement is enabled
To raise and lower the table in 2D, use the following icons. You can also move the floating top table from this view by using a combination of the inner and outer circles.
This view is also used to insert your cassette into the table Bucky. The two grey/gray icons with arrows will indicate whether your cassette is in or out of the Bucky. Blue indicates that the state is active, so in this picture, the cassette is out/not inserted.

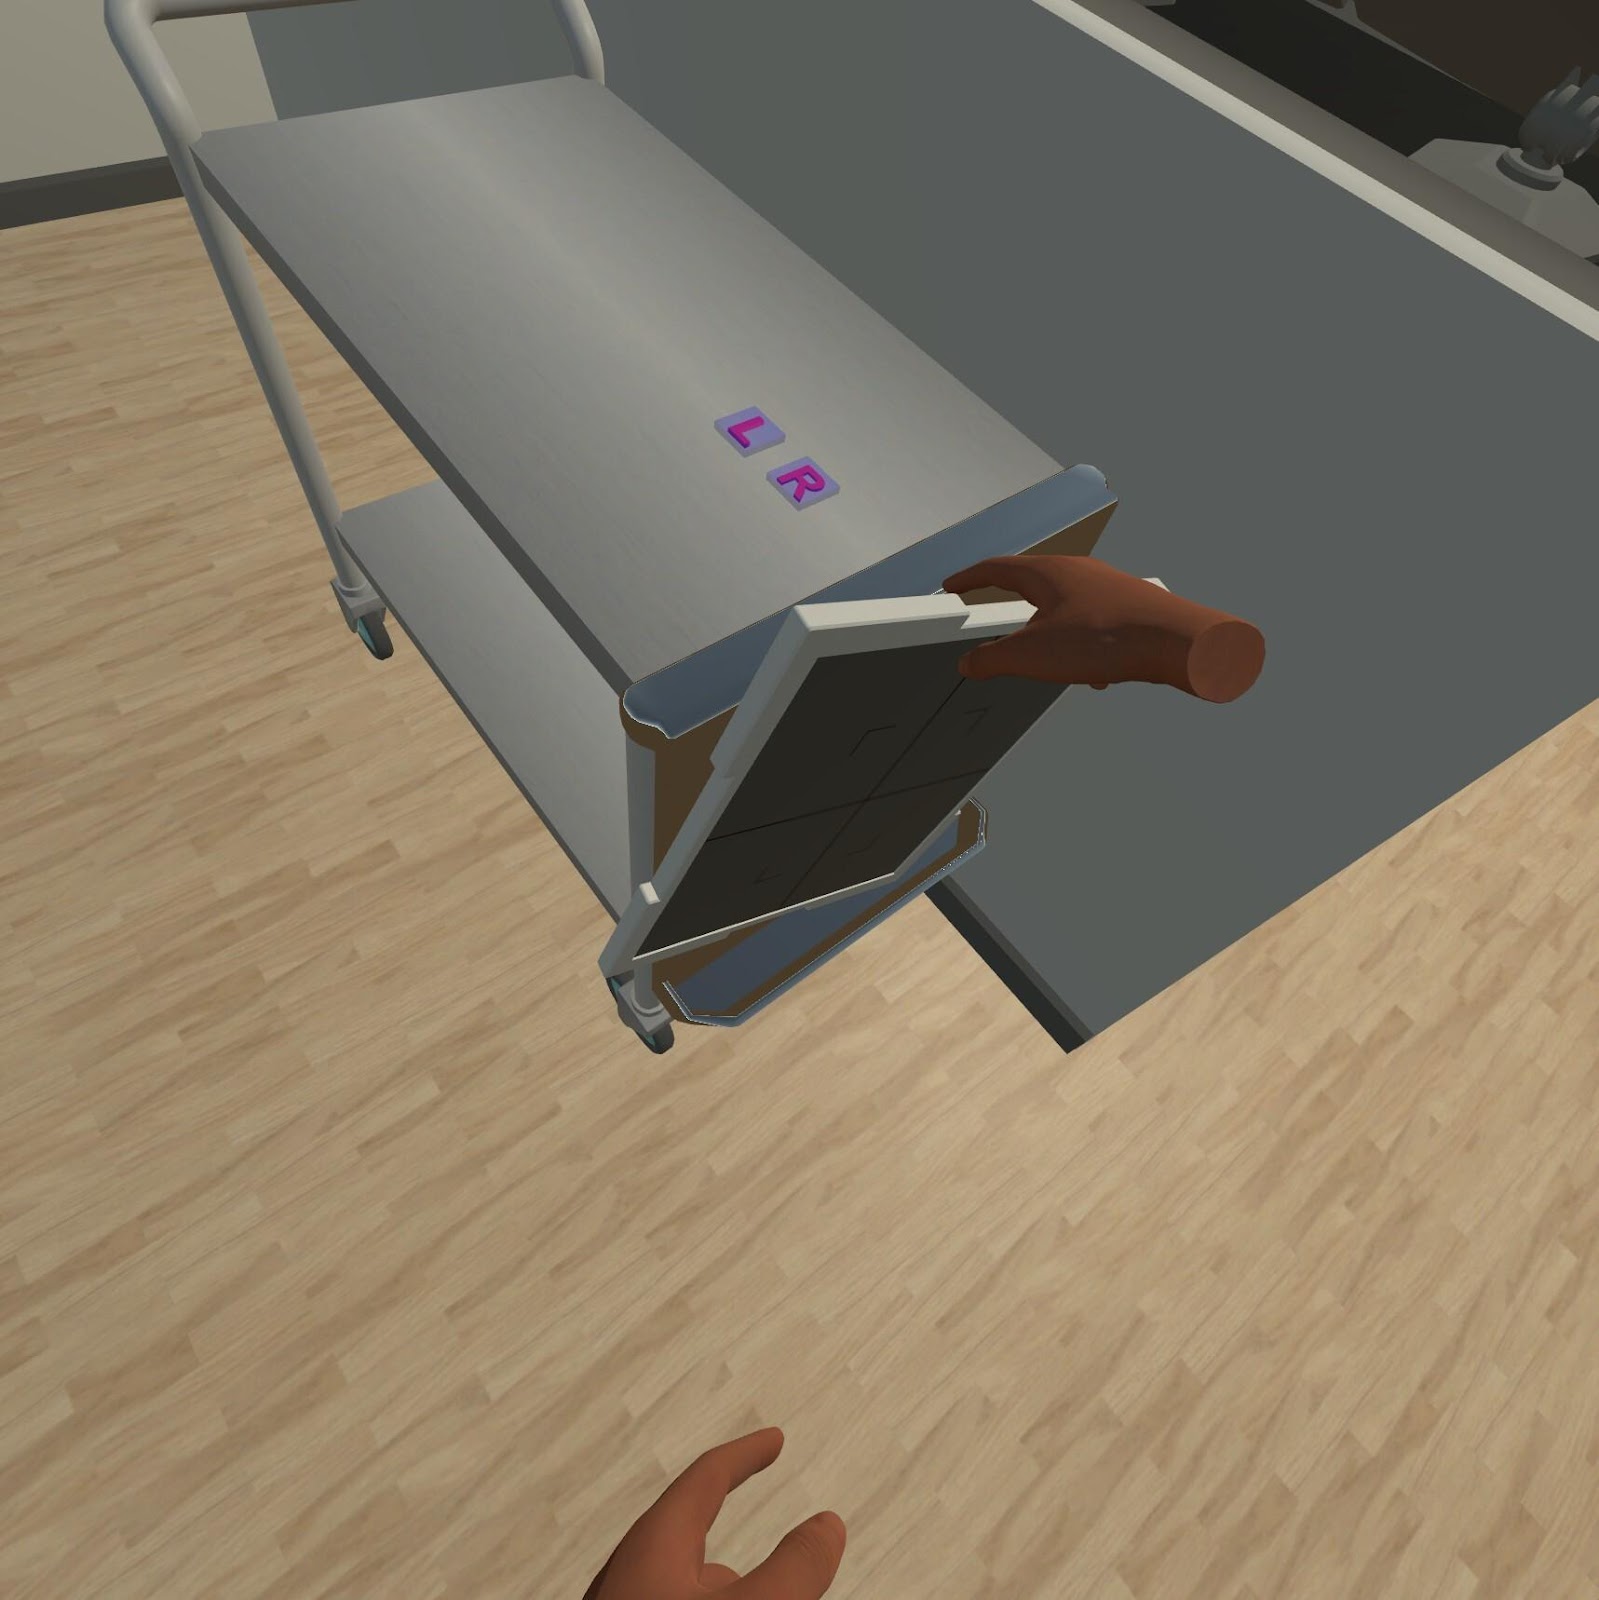
In VR, pull the table Bucky out from under the table by physically gripping it and pulling it.
You will find a cassette and side markers on the silver trolley. You can pick these up and insert the cassette into the Bucky either landscape or portrait. You can place your side markers on the cassette.
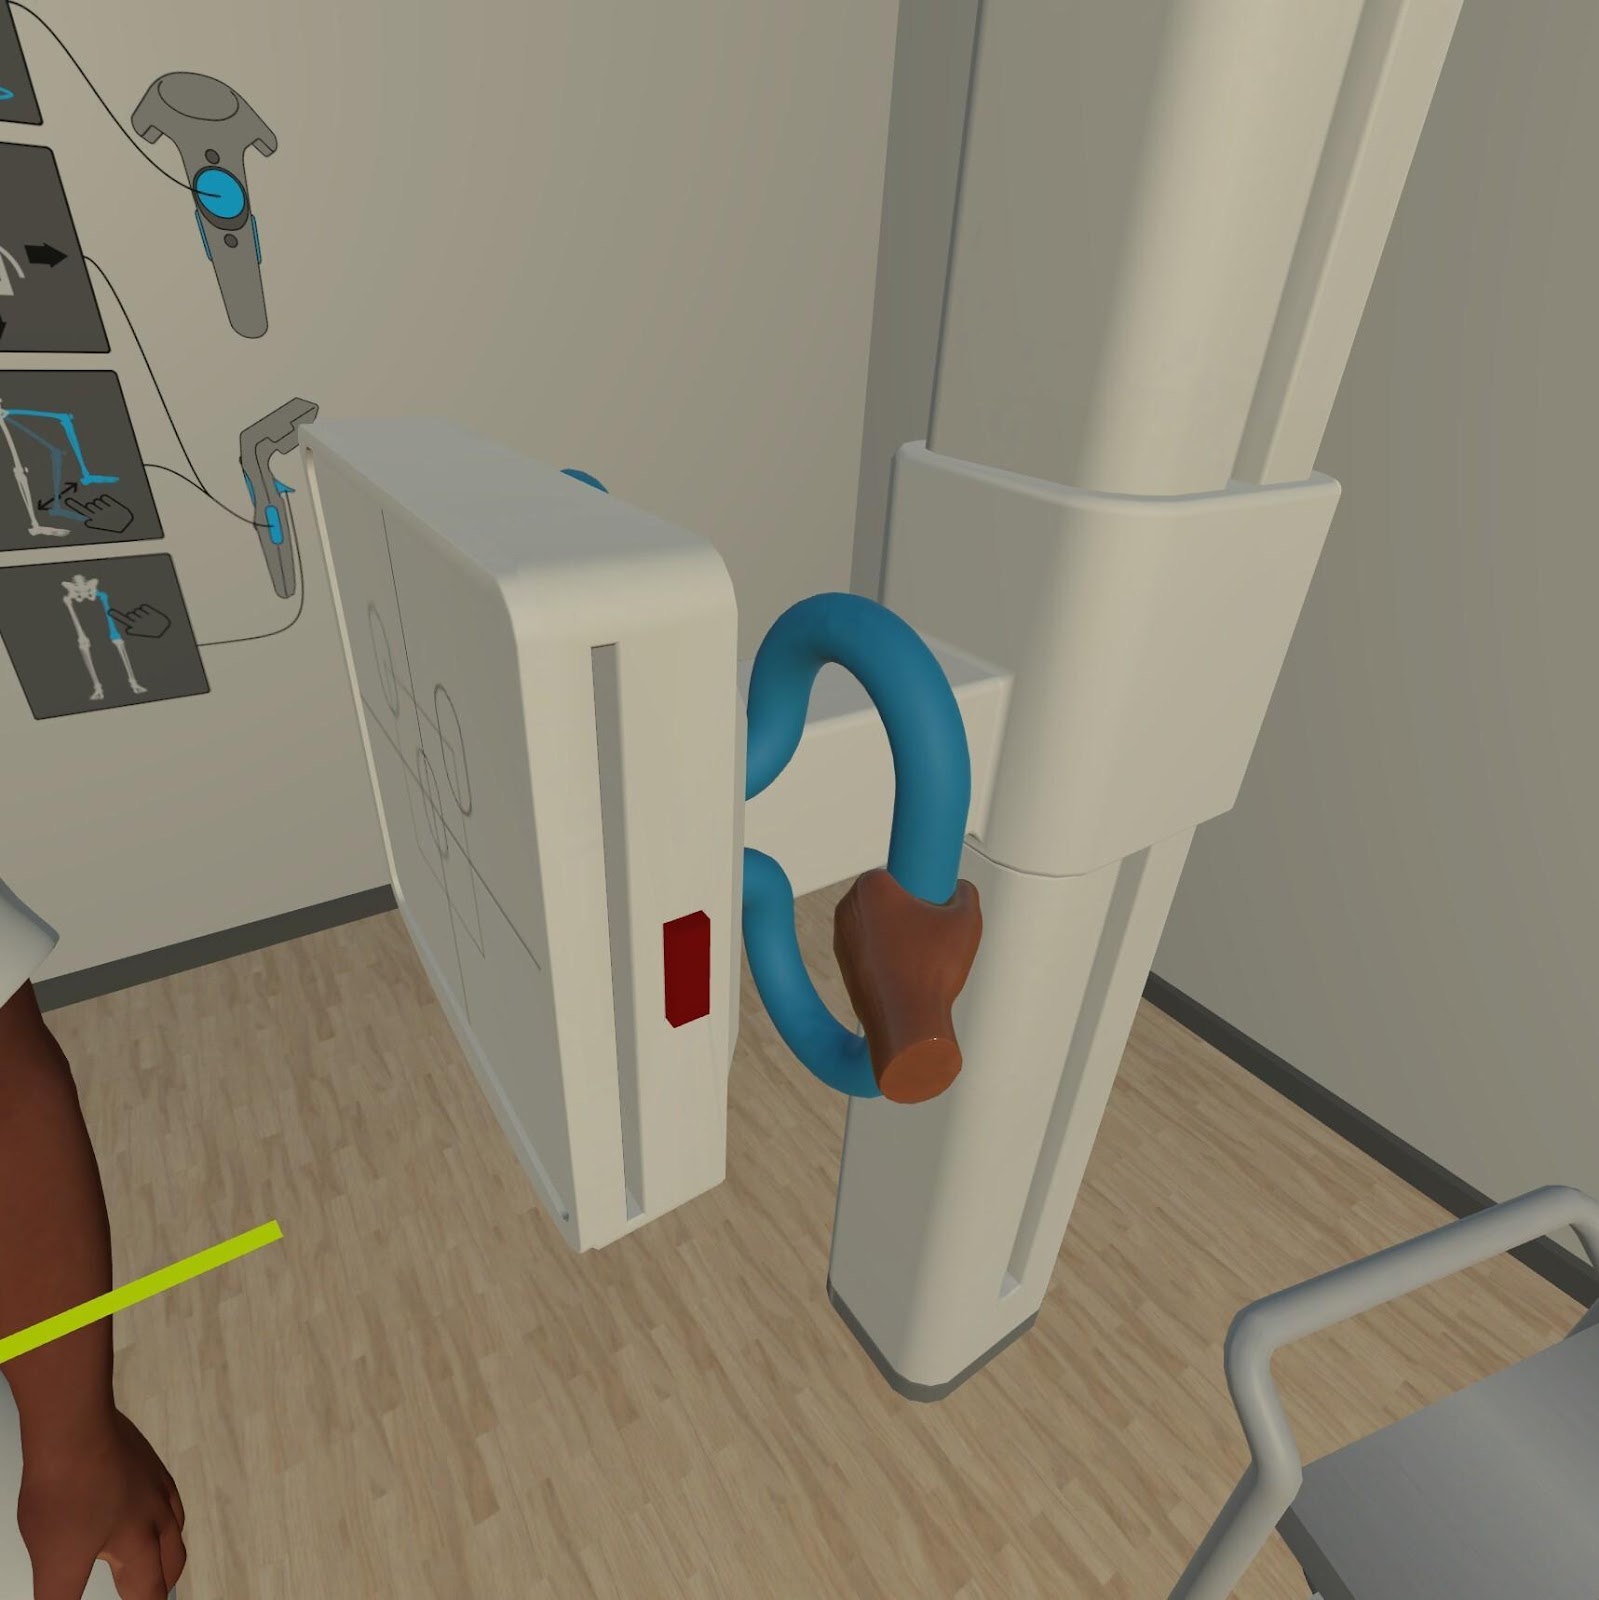
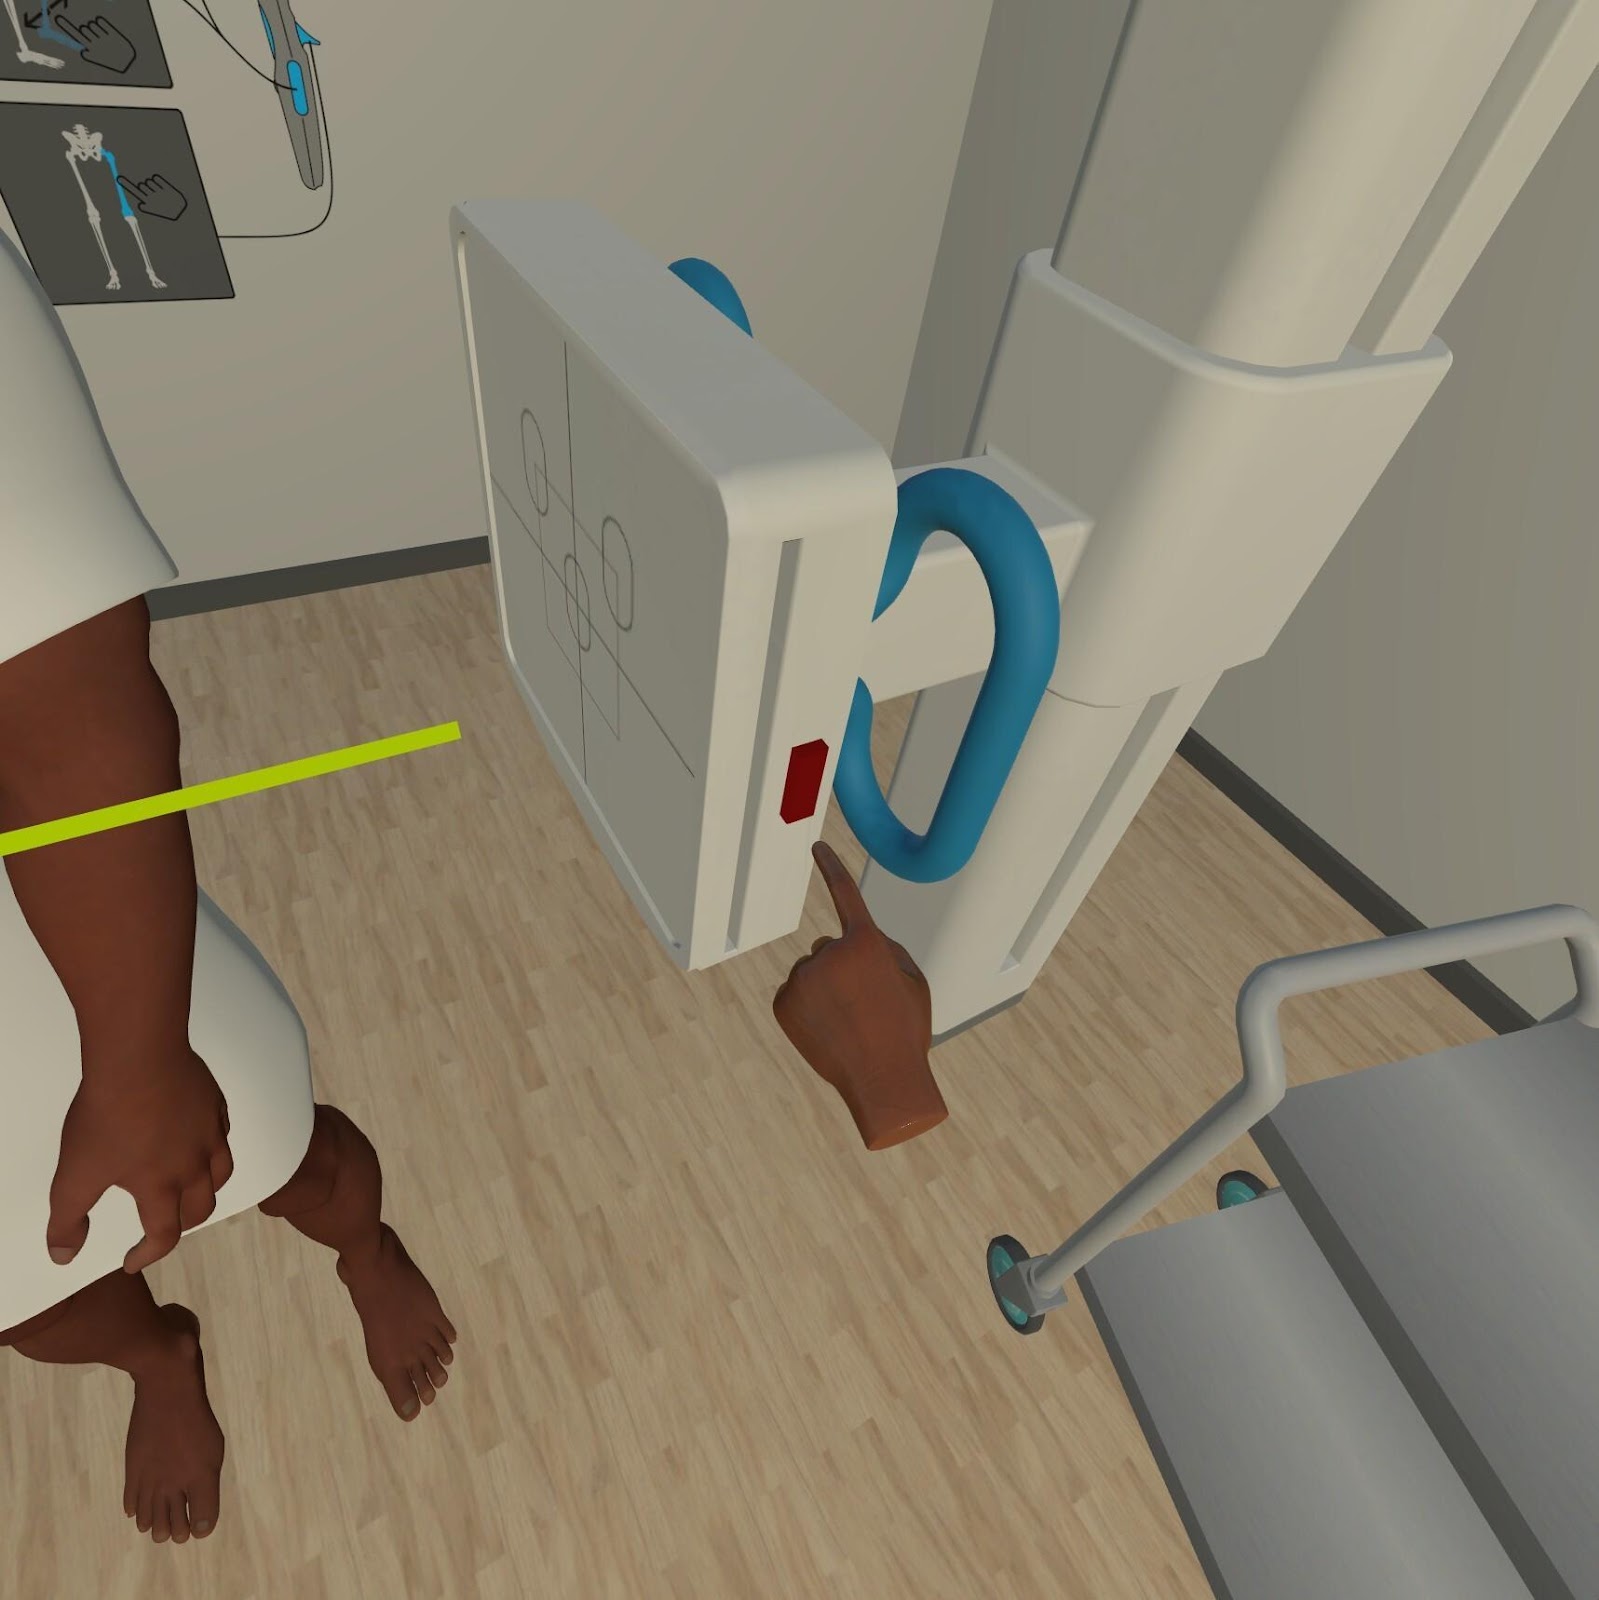
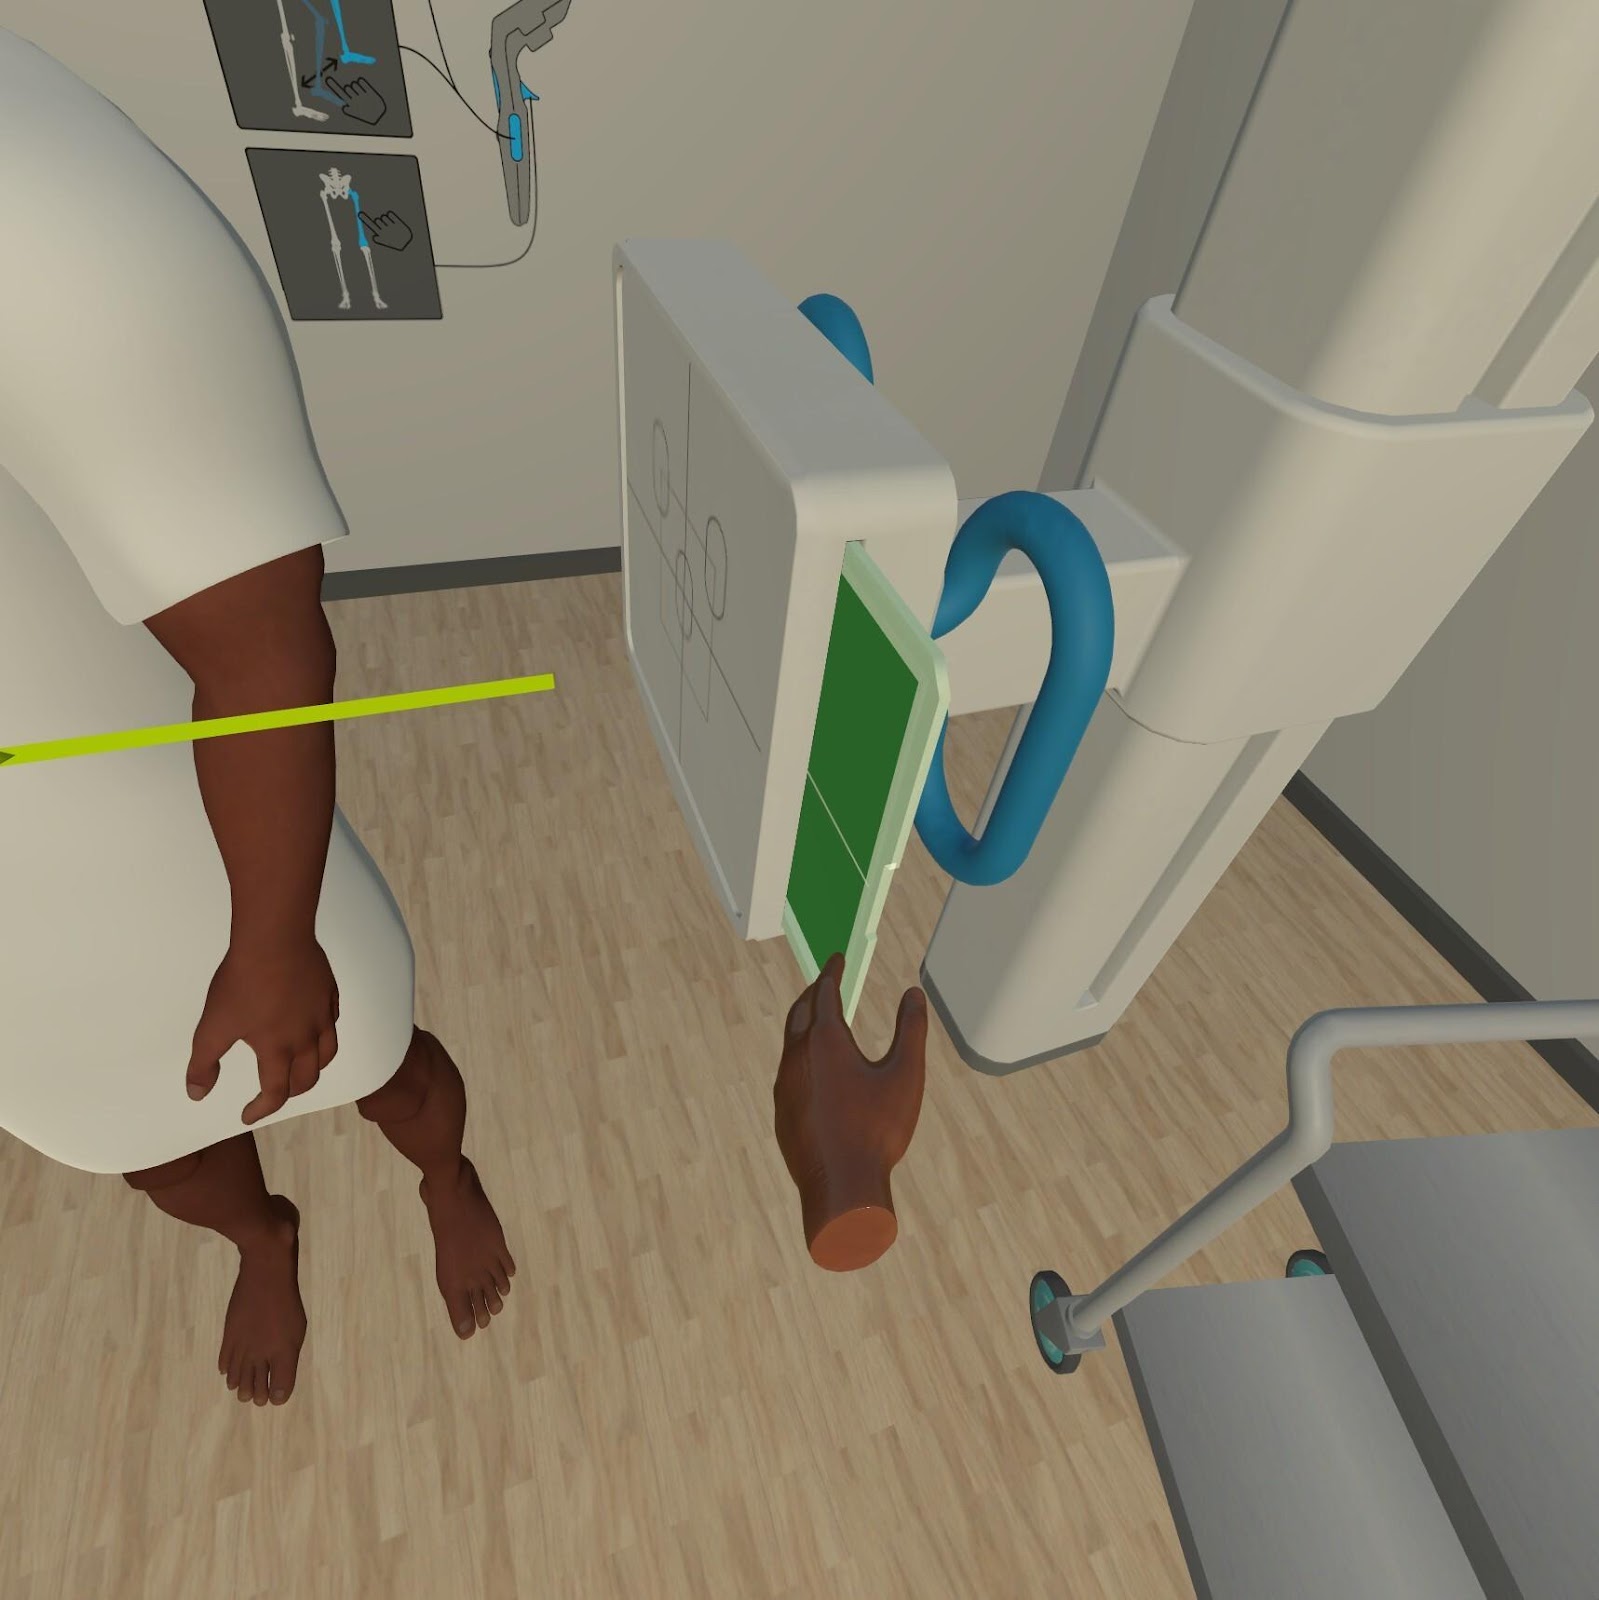
This icon allows you to control the height of your erect detector; it also allows you to insert or remove the digital grid. Similar to how the table Bucky works with inserting/removing the cassette, the blue arrows indicate whether the digital grid is in or out. In this view, it is in.
To alter the height in VR, grip the blue handle and move it up or down physically.
To remove the digital grid in VR, press the red button on the side of the erect detector
The grid will pop out 1/3 of the way and can be removed by gripping it and placing it on the silver trolley. To reinsert the grid, push it into the empty slot, and it will snap into place.
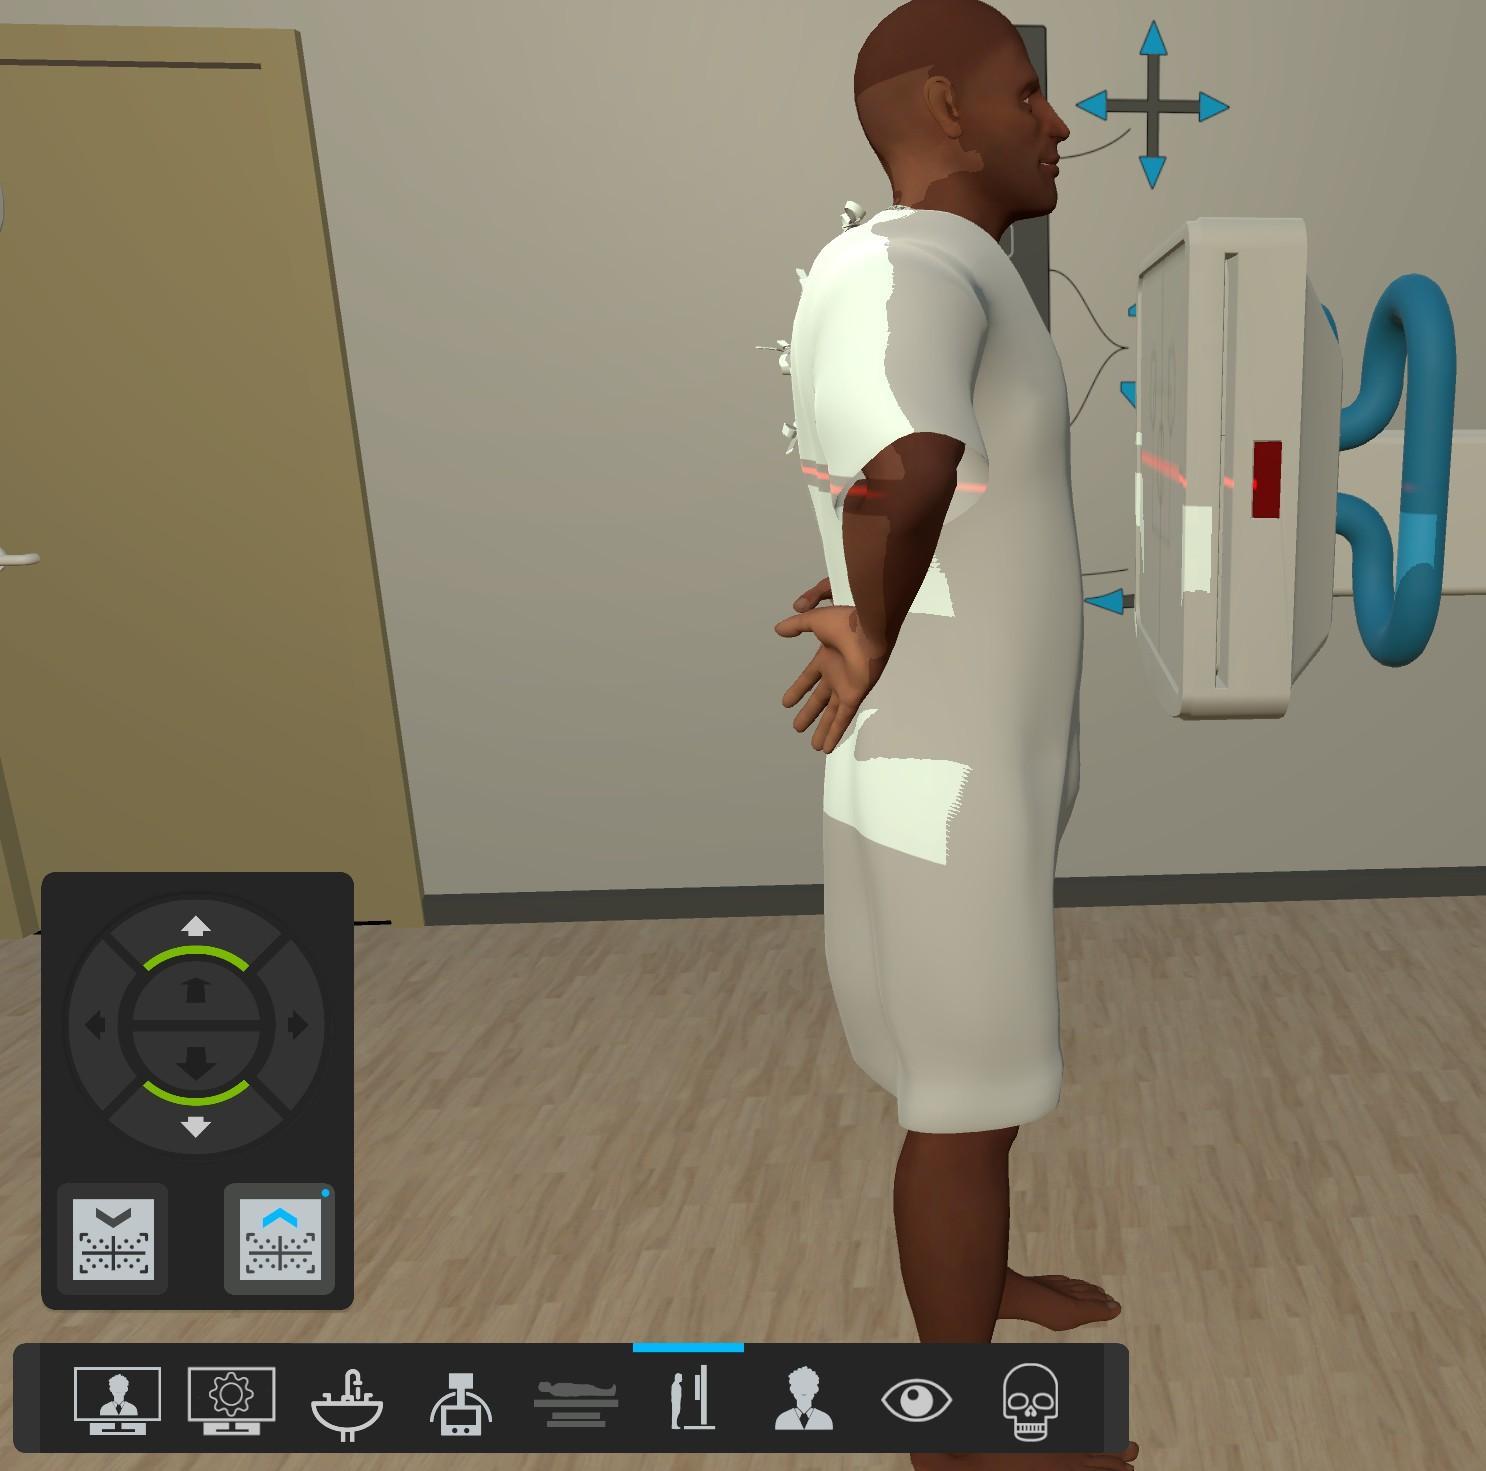
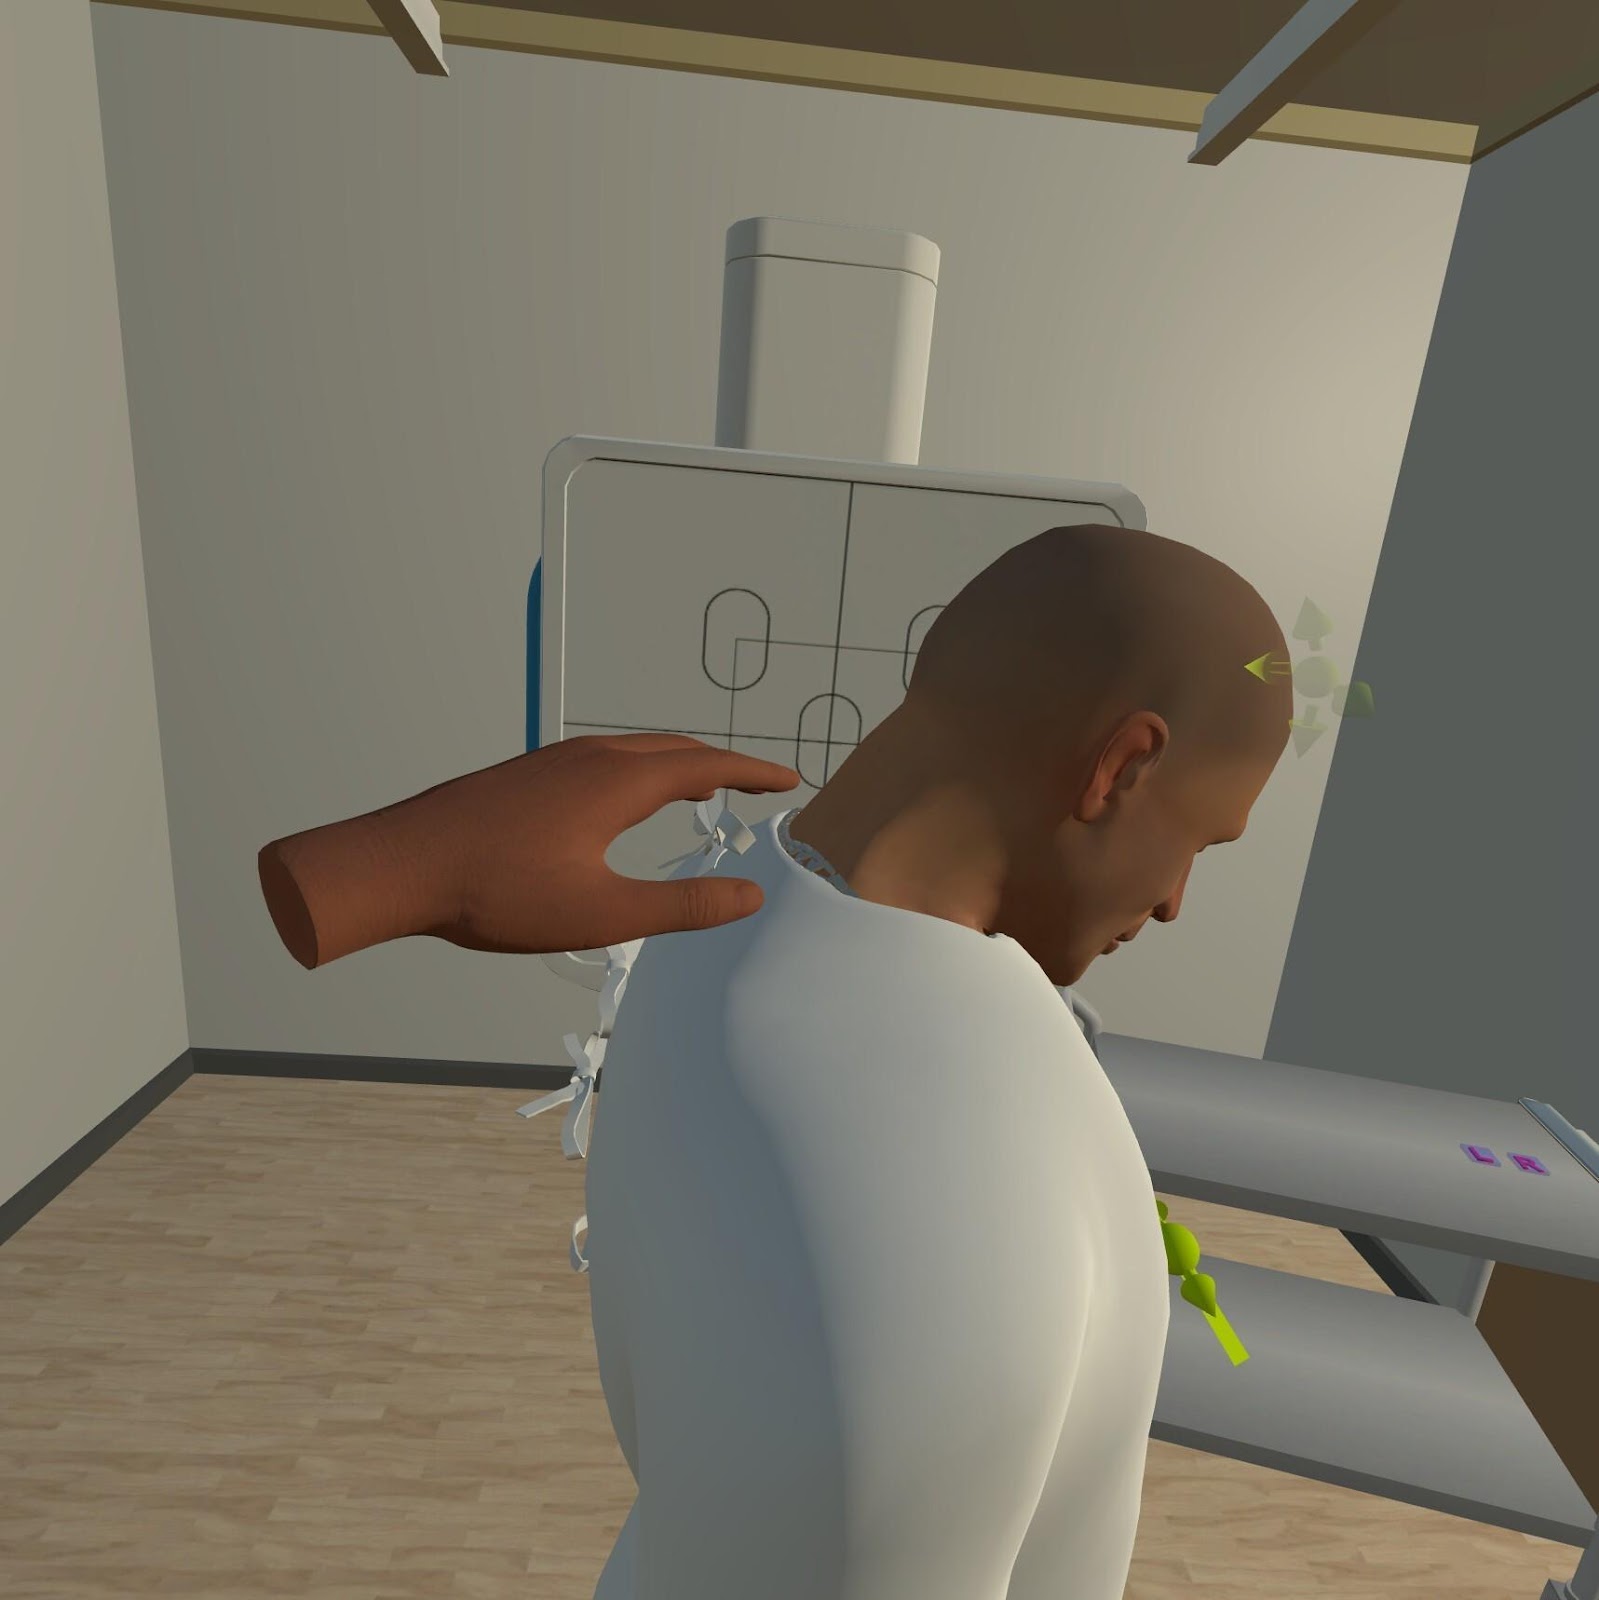
When your hand approaches the area of the patient you wish to move, green arrows will appear.
These arrows indicate:
The green arrow also shows which body part will rotate when movement is applied.
Each radiographic projection includes a set of available patient movements, depending on the requirements of that specific view.
This view, for example, shows the patient can be rotated by their shoulder. Sometimes, for large movements, where the patient would need to take a step, you will be offered a slider (also shown below), and you can push the slider to move the patient.
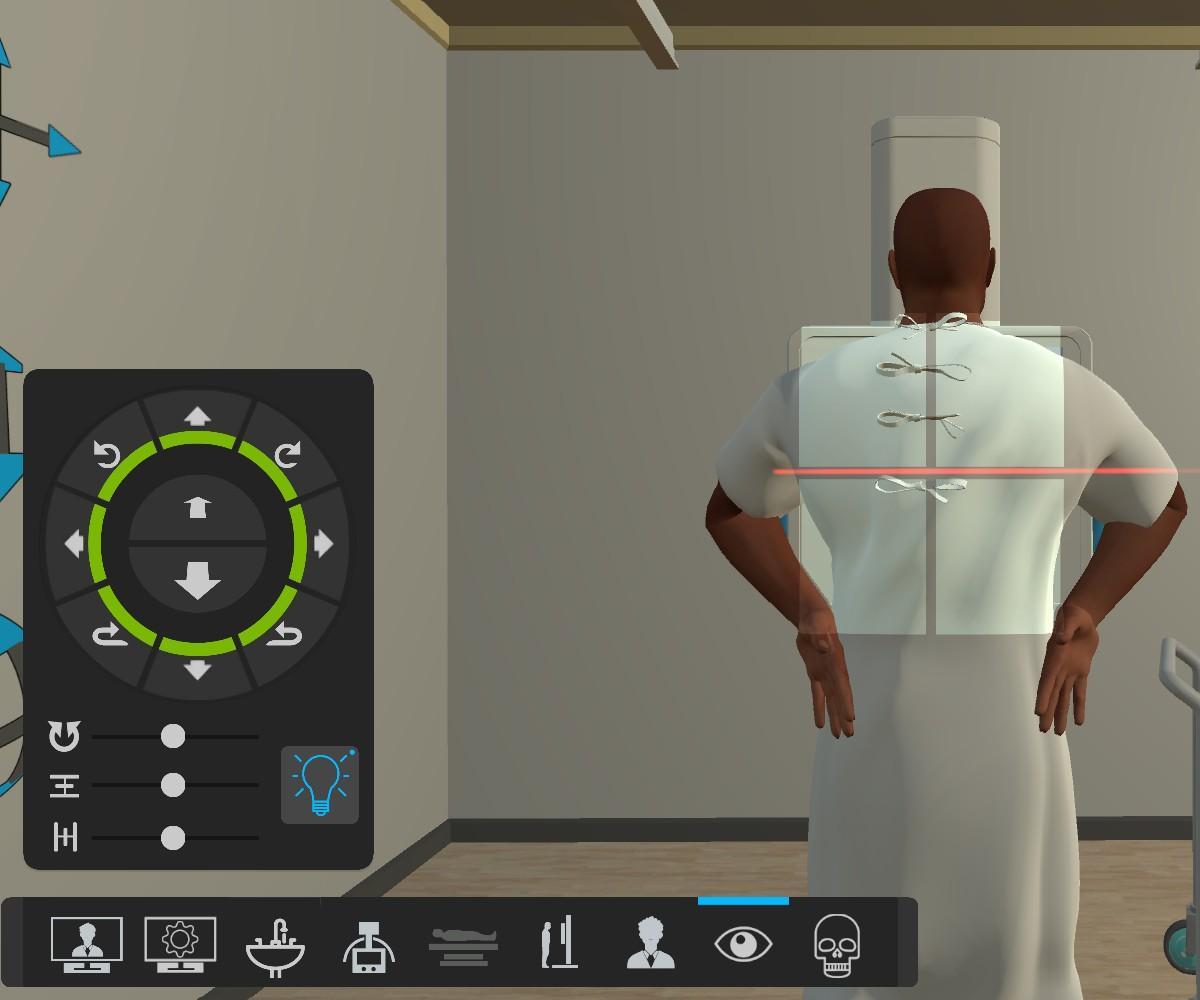
In 2D/Desktop, you can access the movement view by clicking on this button on the icon tray. The numbered arrows correspond to body movements on the patient. You can also apply a side marker and adjust its position here, and remove any jewelry.

To remove jewelry in VR, you need to physically remove it. Touch the jewelry and press the grip button on your controller. It will disappear.
The eye icon allows you to look out of the tube, and is often the best view to adjust the collimation and see the true position of your patient.
The Skull Icon will place you back in the control room
You will need to shut the door
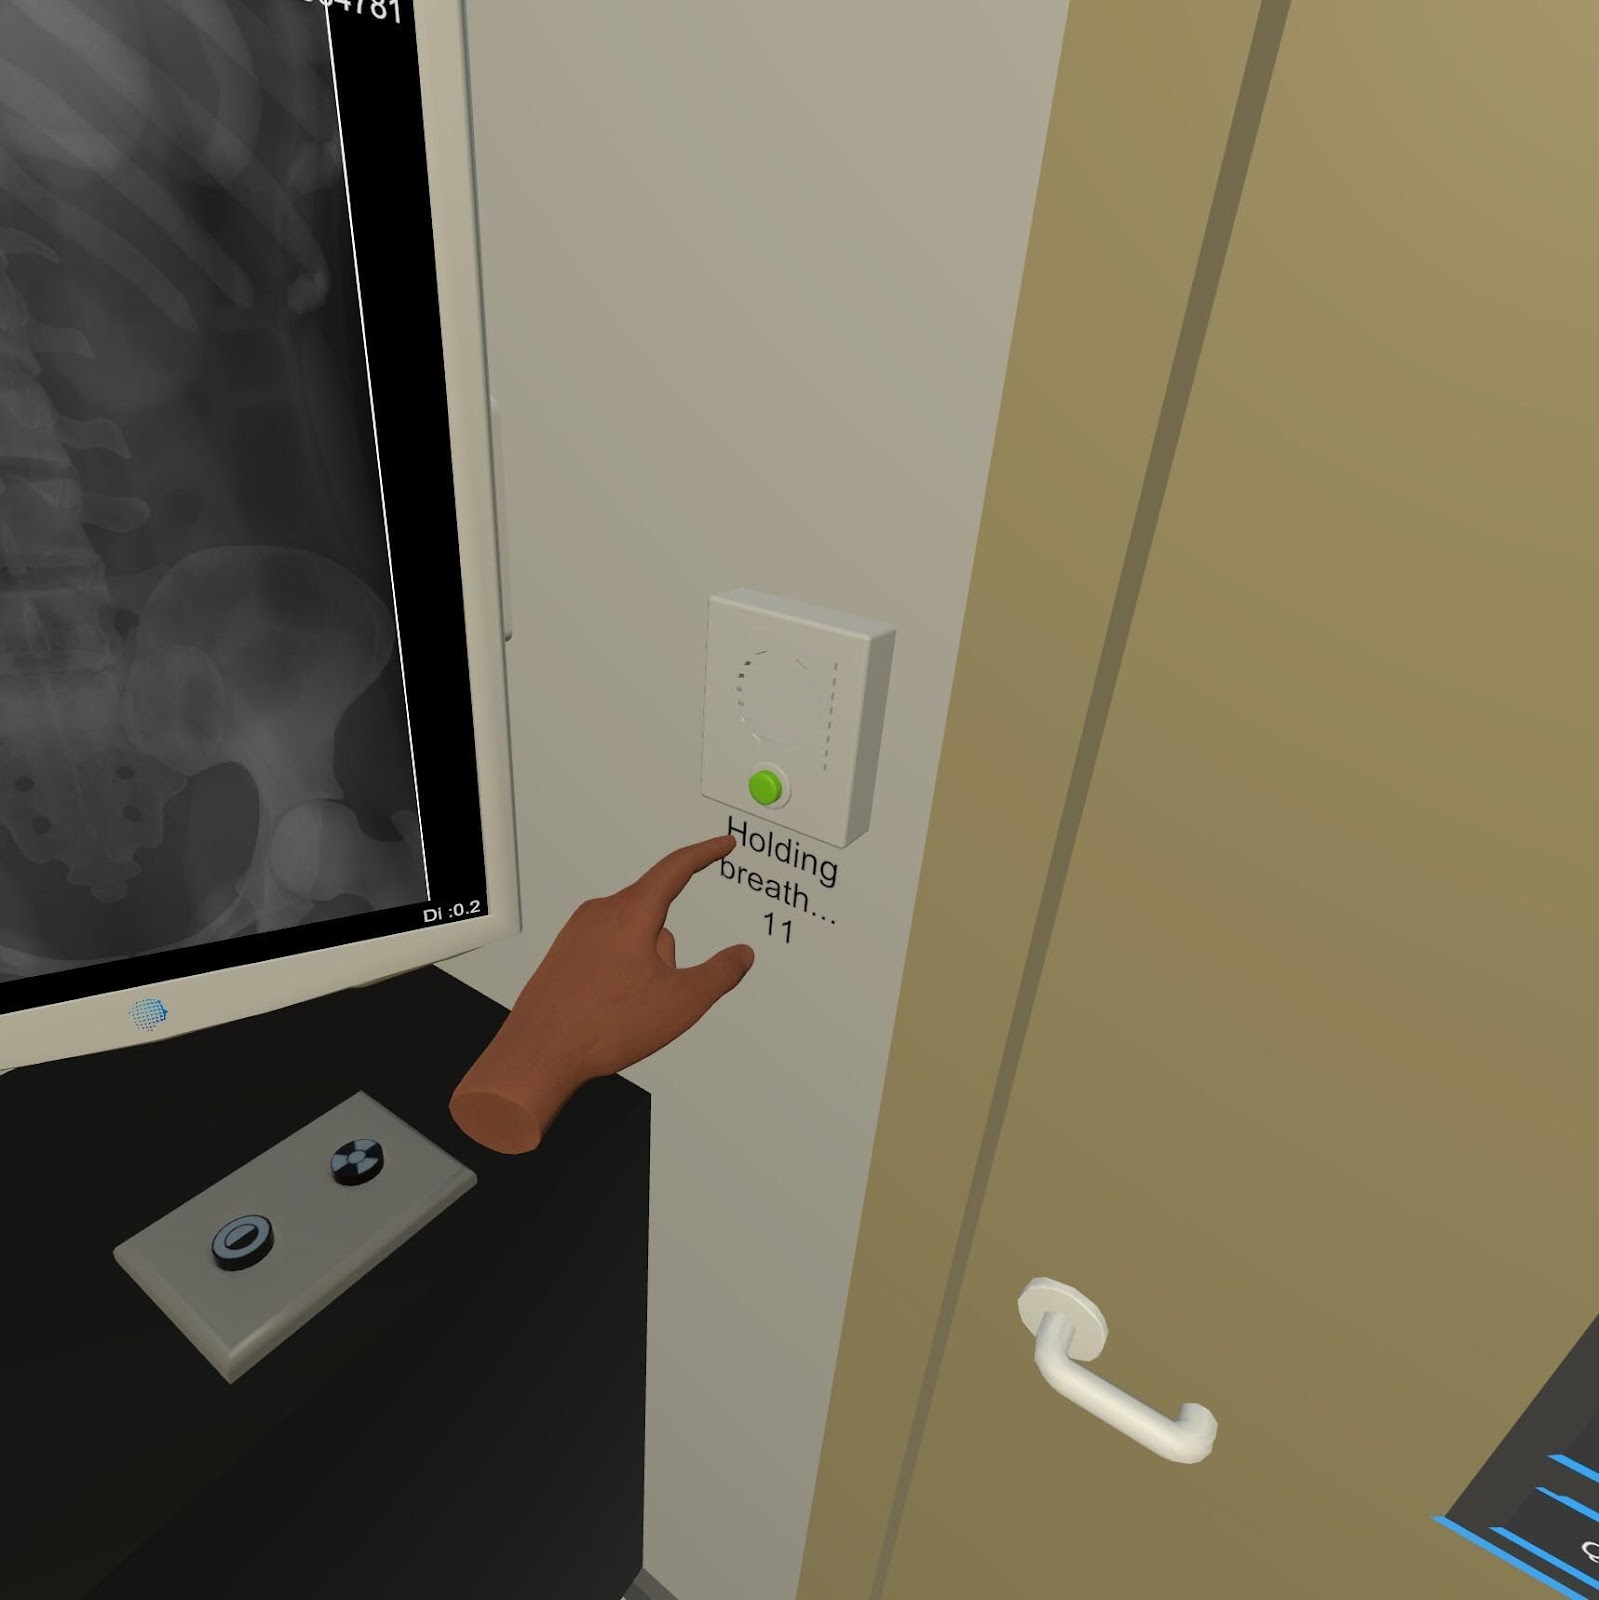
You have the option to select the Lung Icon to enable suspended respiration for 15 seconds - here, the countdown is already on 12.
When you select the Half Circle Icon, this will prepare the Tube, and the Expose Icon will become available for you to select, and the Image to be created.

In VR, you need to close the door manually, and you can ask the patient to suspend respiration by pressing the button on the wall beside the black monitor.
Use the Prepare and Expose buttons under this black monitor to expose.
Reviewing and Adjusting the Radiograph
Once you have obtained your radiograph, you can adjust the following image parameters using the menu button on the screen:
The Deviation Index (DI) is also displayed on screen for reference.
At this stage, if repeats of the projection are necessary, you can adjust the patient’s position or exposure settings, or tube position, etc, and retake another image (or as many as you like). All of these images and their data will be sent to your Reports area in the VMC WebPortal.
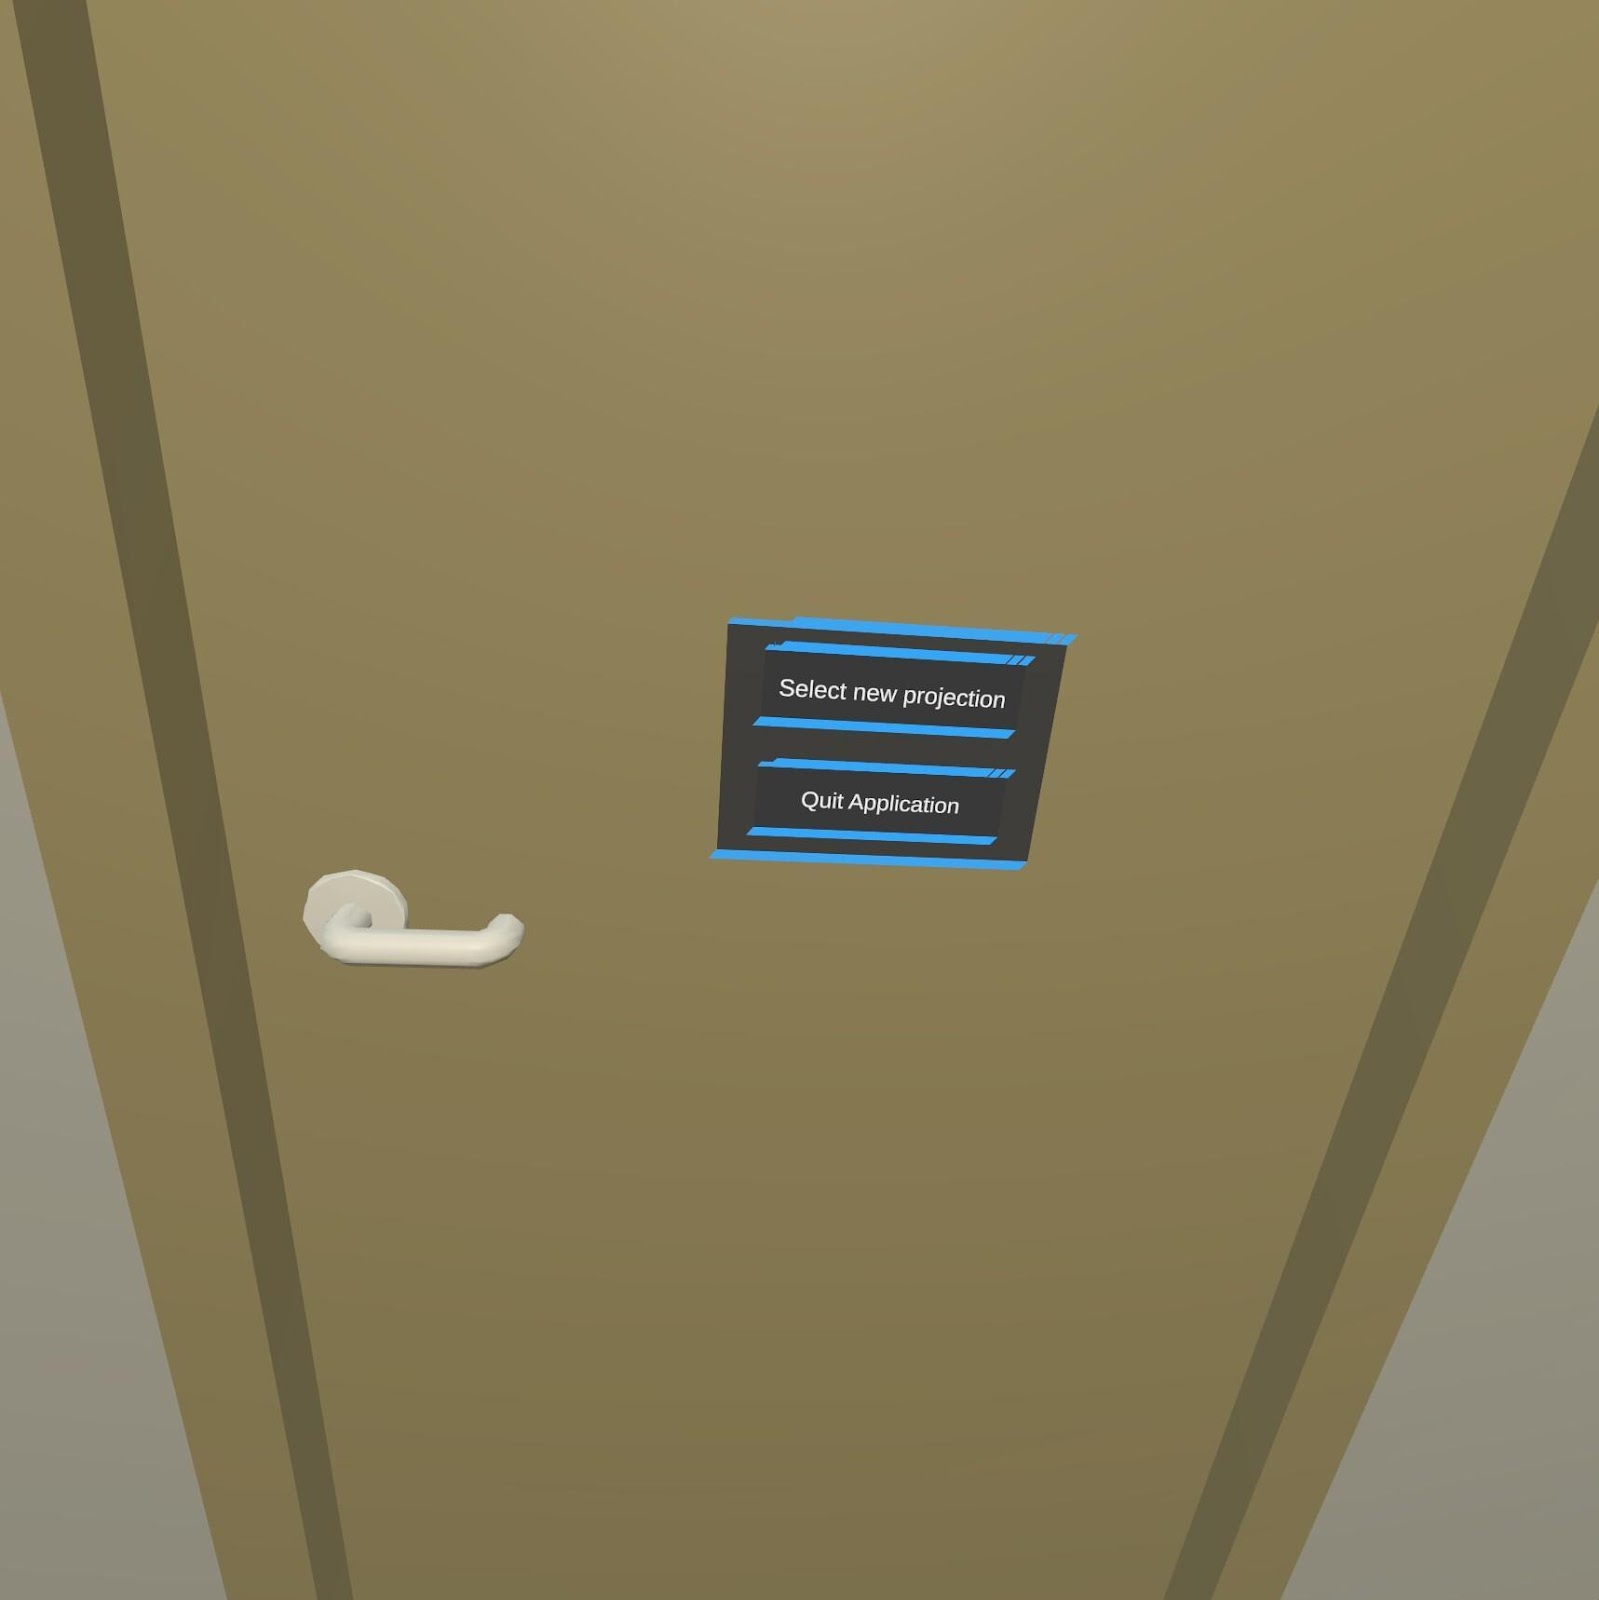

Quit Application closes the simulation application. Selecting a new projection will take you to a lobby where, in 2D, you can either log back in with your email and password or your browser on your computer.

If you choose to log in with your email and password, you will be taken to a screen where you should do that.


If you are using tethered VR, you will need to log back in with your browser.
.png?width=626&height=507&name=image%20(69).png)
If you are using stand-alone VR, you will be given the option to log in with your email and password, but you can also use the Another device Log in option. You should open the Device Login in the menu in the User Portal. You will get an 8-digit code and can log in that way.


From the second time, in that session, you log out to select a new projection, you will not need to log in with your passwod or a code again in the lobby.
Once logged in this way, choose either Practise or Assessment simulation just as you would have done when you were first in the User Portal.
Remember the Assessment Option will have a Radiography room for you with some features removed to push your understanding of the exposure factors.
Once your images have been created and you've exitited the simulation, you should log into your User Portal to complete the Analysis of your images and critique.

In Reports, you will see all of the images you have taken and be able to analyse the data with each image.
Teaching staff will be able to see what work their students have done and can easily see whihc images have been analysed. Green ticks mean the series has been analysed. Half green ticks mean some analysis has been started but is not complete, and a grey/gray dash means the analysis has not started. Students cannot see each other's work.

Click on View Report to see the image and data relating to that session. All of the images you have produced in the session will be in the one report. You can scroll through them.

Explore the technology behind digital radiographic grids with a detailed look at advanced algorithms that improve image quality and patient safety
Explore the transformative journey of Buckys in medical imaging, from their historical origins to modern digital alternatives.
Educators must lead the shift from physical to digital simulation. Students expect it, research confirms it and scalable, immersive tools make it...